Kenwood DRV-A501W Operation Manual - Page 56
Troubleshooting
 |
View all Kenwood DRV-A501W manuals
Add to My Manuals
Save this manual to your list of manuals |
Page 56 highlights
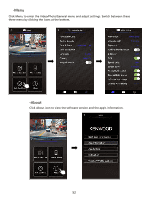
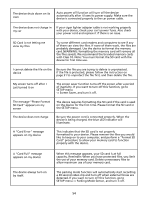
Troubleshooting Blurred Image (Video) Unable to insert SD card The device comes with a protective lens cover for the camera lens, be sure to remove it. Wipe the lens with a soft cloth until any debris/stains are removed. Clean your vehicles windshield where the camera is placed. Make sure the metal portion of the memory card faces the screen side. Once inserted, push the card until a CLICK sound is heard. SD card does not release from the devices The device releases the SD Card by pressing the SD card forward. By applying the pressure on the SD card, a small click sound will be made. If you are unable to remove the SD card, use the edge of a small coin to push forward until the click sound is made. Video files can not be played The device video files are recorded in .MOV format. These files may not be played on your computer if you do not have a suitable video player installed. Video files jump when they are being played The memory card that the device recommends for best quality is the Class 10 SD Card. If your computer does not recognize the video files, try another computer to view the recorded video. Copy the video file on to the computer and allow for the computer video player rather than the device Playback feature. The photos come out blurry Be sure to hold the device still while you take your photo. Reminder: The photo is not taken unless you have heard the shutter click. Also make sure the protective lens cover is removed and the lenses are clean. The total video recording time is only a few minutes long I cannot save my video files to my computer through the USB storage feature You may have a small amount of available space left for your SD card. Back up all the files you need from the SD card. Only AFTER you back up all the files you need, format the SD card with the device. The functions have been optimized to work properly with both Windows and Mac computers. Please reboot your computers. Make sure the device is connected properly. The suction cup does not attach to the surface Be sure the protective film on the suction cup has been removed. Before you place it, make sure the surface is clean and smooth. Wipe down the surface and add a small amount of moisture to the suction cup to allow for a stronger bond. Do not apply on a non-smooth surface or an area with paint. 53
-
 1
1 -
2
-
3
-
4
-
5
-
6
-
7
-
8
-
9
-
10
-
11
-
12
-
13
-
14
-
15
-
16
-
17
-
18
-
19
-
20
-
21
-
22
-
23
-
24
-
25
-
26
-
27
-
28
-
29
-
30
-
31
-
32
-
33
-
34
-
35
-
36
-
37
-
38
-
39
-
40
-
41
-
42
-
43
-
44
-
45
-
46
-
47
-
48
-
49
-
50
-
 51
51 -
 52
52 -
 53
53 -
 54
54 -
 55
55 -
 56
56 -
 57
57 -
 58
58 -
 59
59 -
 60
60 -
 61
61 -
62
-
63
 |
 |
