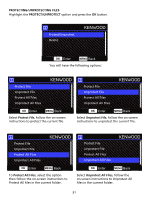
Kenwood DRV-A501W Operation Manual - Page 39
Share Button
 |
View all Kenwood DRV-A501W manuals
Add to My Manuals
Save this manual to your list of manuals |
Page 39 highlights
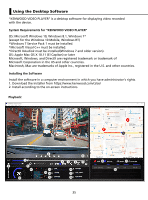
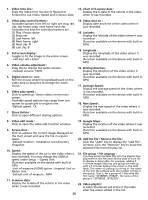
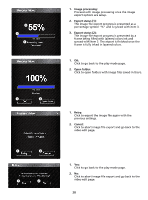
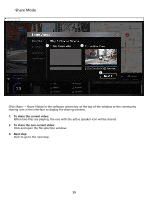
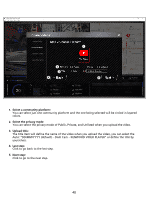
1. Video time line : 12. Chart of G-sensor data : Drag the Video time line bar to Rewind or Display the G-data of the vehicle in the video Forward to cue Video, Speed and G-Sensor date. when it was recorded. 2. Video play control buttons : Available options from left to right are stop, last clip, last frame, play, next frame next clip. Available hot keys for individual options are (1) Play / Pause: space (2) Stop: esc (3) Last frame: left (4) Next frame: right (5) Next clip: N (6) Last clip: B 3. Full screen display : Toggle to fit the image to the entire screen. - Hot key: Alt + Enter 4. Video volume adjustment : Drag this to change the audio volume. - Default volume: 100% 5. Digital zoom in / out : Roll the mouse wheel forward/backward on the video area or drag this to change the zoom in/out. 6. Video play speed : Click to speed up / down videos on the main screen. Available speed options may range from one quater to quadruple to original one. -Default speed : 1X 7. Share Button : Click to open different sharing options. 13. Video shot on : Display date and time of the video when it was recorded. 14. Latitude : Display the latitude of the video where it was recorded. (Function available on the device with built-in GPS) 15. Longitude : Display the longitude of the video where it was recorded. (Function available on the device with built-in GPS) 16. Driving direction : Display the direction of the video where it was recorded. (Function available on the device with built-in GPS) 17. Average Speed : Display the average speed of the video where it was recorded. (Function available on the device with built-in GPS) 18. Max Speed : Display the max speed of the video where it was recorded. (Function available on the device with built-in GPS) 8. Video edit mode : 19. Google Maps : Click to open the video edit function window. Display the location of the video where it was recorded. 9. Screen shot : (Function available on the device with built-in Click to capture the current image displayed on GPS) the main screen and save the file in a given space. 20. Add the file / Remove the file : -Default location : installation root directory Click the "Add" key to display the "add file" /Snapshot. window. Click the "Remove" key to erase the selected files from the play list. 10. Speed : Display the speed of the car in the video when it was recorded. You may change the UOM of speed under Setup ÷ Speed Unit. (Function available on the device with built-in GPS) -Unit of measure (UOM) option : Imperial Unit or Metric Unit -Default unit of measure : MPH 11. G-sensor data : 21. File group / File ungroup : You may group multiple files into the playlist then play them in one file and link the data of each file to display in data table. For example, adding 5 1-minute length files into one group will end up with a 5 minutes display time shown in the data table. The name of a group is a string of the name of the first file suffixed with the number of files in the group. That is, for a group of 5 files with the first name "20180925_191823", the name of the group is "20180925_191823(5)". Display the G-data of the vehicle in the video when it was recorded. 22. Video playlist : A video thumbnail will show in this table after the videos added in the list. 36
-
 1
1 -
2
-
3
-
4
-
5
-
6
-
7
-
8
-
9
-
10
-
11
-
12
-
13
-
14
-
15
-
16
-
17
-
18
-
19
-
20
-
21
-
22
-
23
-
24
-
25
-
26
-
27
-
28
-
29
-
30
-
31
-
32
-
33
-
 34
34 -
 35
35 -
 36
36 -
 37
37 -
 38
38 -
 39
39 -
 40
40 -
 41
41 -
 42
42 -
 43
43 -
 44
44 -
45
-
46
-
47
-
48
-
49
-
50
-
51
-
52
-
53
-
54
-
55
-
56
-
57
-
58
-
59
-
60
-
61
-
62
-
63
 |
 |
