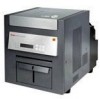
Kodak 6850 User Guide - Page 12
Installing the Trim Tray, Installing the Print Catcher
 |
View all Kodak 6850 manuals
Add to My Manuals
Save this manual to your list of manuals |
Page 12 highlights
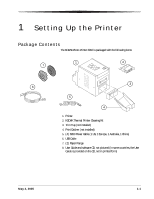
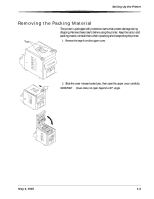
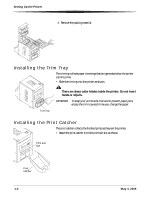
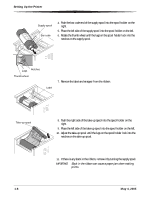
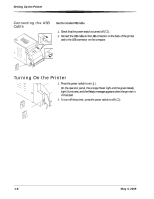
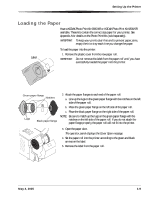
Setting Up the Printer 3. Remove the packing material. Installing the Trim Tray The trim tray collects paper trimmings that are generated when the printer cuts the prints. • Slide the trim tray into the printer as shown. CAUTION: There are sharp cutter blades inside the printer. Do not insert hands or objects. IMPORTANT: To keep your prints dust-free and to prevent paper jams, empty the trim tray each time you change the paper. Trim tray Installing the Print Catcher The print catcher collects the finished prints as they exit the printer. • Attach the print catcher from the print exit slot as shown. Print exit slot Print catcher 1-4 May 4, 2005
-
 1
1 -
2
-
3
-
4
-
5
-
6
-
 7
7 -
 8
8 -
 9
9 -
 10
10 -
 11
11 -
 12
12 -
 13
13 -
 14
14 -
 15
15 -
 16
16 -
 17
17 -
18
-
19
-
20
-
21
-
22
-
23
-
24
-
25
-
26
-
27
-
28
-
29
-
30
-
31
-
32
-
33
-
34
-
35
-
36
-
37
-
38
-
39
-
40
-
41
-
42
-
43
-
44
-
45
-
46
-
47
-
48
-
49
-
50
-
51
-
52
-
53
-
54
-
55
-
56
-
57
-
58
 |
 |

1-4
May 4, 2005
Setting Up the Printer
3.
Remove the packing material.
Installing the Trim Tray
The trim tray collects paper trimmings that are generated when the printer
cuts the prints.
•
Slide the trim tray into the printer as shown.
CAUTION
:
There are sharp cutter blades inside the printer. Do not insert
hands or objects.
IMPORTANT:
To keep your prints dust-free and to prevent paper jams,
empty the trim tray each time you change the paper.
Installing the Print Catcher
The print catcher collects the finished prints as they exit the printer.
•
Attach the print catcher from the print exit slot as shown.
Trim tray
Print exit
slot
Print
catcher