Kodak 6850 User Guide - Page 17
Loading the Paper, Have a KODAK Photo Print Kit 6800/4R or KODAK Photo Print Kit 6800/6R - paper flange
 |
View all Kodak 6850 manuals
Add to My Manuals
Save this manual to your list of manuals |
Page 17 highlights
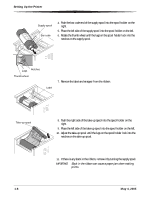
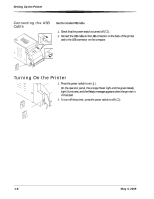
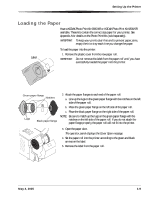
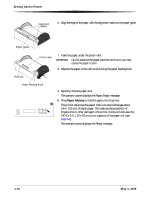
Setting Up the Printer Loading the Paper Have a KODAK Photo Print Kit 6800/4R or KODAK Photo Print Kit 6800/6R available. These kits contain the correct size paper for your printer. See Appendix A for details on the Photo Print Kits (sold separately). IMPORTANT: To keep your prints dust-free and to prevent paper jams, empty the trim tray each time you change the paper. To load the paper into the printer: 1. Remove the plastic cover from the new paper roll. Label IMPORTANT: Do not remove the label from the paper roll until you have successfully loaded the paper into the printer. Green paper flange Notches 2. Attach the paper flanges to each end of the paper roll. a. Line up the lugs on the green paper flange with the notches on the left side of the paper roll. b. Place the green paper flange on the left side of the paper roll. c. Place the black paper flange on the right side of the paper roll. NOTE: Be sure to match up the lugs on the green paper flange with the Lugs Black paper flange notches on the left side of the paper roll. If you do not attach the paper flange properly, the paper roll will not fit into the printer. 3. Open the paper door. The operator panel displays the Cover Open message. 4. Set the paper roll into the printer according to the green and black arrows on the label. 5. Remove the label from the paper roll. May 4, 2005 1-9
-
 1
1 -
2
-
3
-
4
-
5
-
6
-
7
-
8
-
9
-
10
-
11
-
 12
12 -
 13
13 -
 14
14 -
 15
15 -
 16
16 -
 17
17 -
 18
18 -
 19
19 -
 20
20 -
 21
21 -
 22
22 -
23
-
24
-
25
-
26
-
27
-
28
-
29
-
30
-
31
-
32
-
33
-
34
-
35
-
36
-
37
-
38
-
39
-
40
-
41
-
42
-
43
-
44
-
45
-
46
-
47
-
48
-
49
-
50
-
51
-
52
-
53
-
54
-
55
-
56
-
57
-
58
 |
 |
