Kodak 6850 User Guide - Page 25
Calibrating the Printer, Installing the Calibration Software, Using the Calibration Utility - specifications
 |
View all Kodak 6850 manuals
Add to My Manuals
Save this manual to your list of manuals |
Page 25 highlights
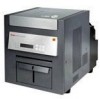
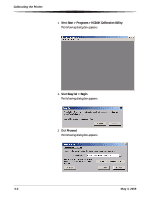
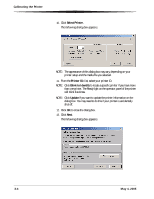
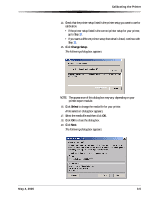
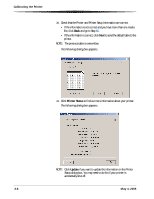
3 Calibrating the Printer The KODAK Calibration Utility (calibration utility) allows the KODAK Photo Printer to produce the best possible color response. Printer calibration adjusts the response of the printer so that a specific data input value yields a specific color density output. When a printer is properly calibrated, it generates the correct density for each given data value. Your KODAK Photo Printer is shipped with default factory calibration values. You should be able to set up your printer and begin printing right away without having to first calibrate the printer. However, if you are dissatisfied with the color of your prints, follow the steps in this chapter to calibrate your printer. Installing the Calibration Software 1. Insert the CD that came with the printer into your CD-ROM drive. The CD Browser launches automatically. If it does not, double-click the Kodak68xx.exe file in the CD root directory. 2. Select your language. 3. Click Software. NOTE: Before installing the software, read the Calibration Software Readme file for important information and updates about the software. 4. Click Calibration Software to start the installer. 5. Follow the on-screen instructions to install the calibration software. Using the Calibration Utility Before you use the calibration utility, make sure you are familiar with how your KODAK Photo Printer operates. Calibrate your printer whenever the color balance of prints does not look right. You may also want to calibrate your printer after it has been serviced. Easy Cal is a five-step process that quickly calibrates your printer using the Visual Gray Balance method. Before using Easy Cal, start the calibration utility. May 4, 2005 3-1
-
 1
1 -
2
-
3
-
4
-
5
-
6
-
7
-
8
-
9
-
10
-
11
-
12
-
13
-
14
-
15
-
16
-
17
-
18
-
19
-
 20
20 -
 21
21 -
 22
22 -
 23
23 -
 24
24 -
 25
25 -
 26
26 -
 27
27 -
 28
28 -
 29
29 -
 30
30 -
31
-
32
-
33
-
34
-
35
-
36
-
37
-
38
-
39
-
40
-
41
-
42
-
43
-
44
-
45
-
46
-
47
-
48
-
49
-
50
-
51
-
52
-
53
-
54
-
55
-
56
-
57
-
58
 |
 |