Kodak 9810 User Guide - Page 16
Installing the Printer Driver, Borderless Printing, Software, Printer Driver - digital photo
 |
UPC - 041778939178
View all Kodak 9810 manuals
Add to My Manuals
Save this manual to your list of manuals |
Page 16 highlights
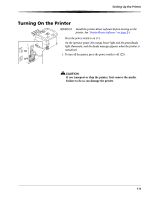
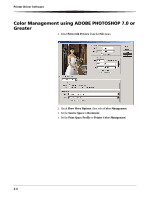
Printer Driver Software Installing the Printer Driver This procedure will install the printer driver and Diagnostic tool. NOTE: You must have Administrator privilege to install the printer driver. 1. Press the power switch to off ( ) to turn off the printer. 2. Insert the CD that came with the printer into your CD-ROM drive. The CD Browser launches automatically. If it does not, double-click the Kodak9810.exe file in the CD root directory. 3. Select your language. 4. Click Software. NOTE: Before installing the printer driver, read the Printer Driver Readme file for information and updates. 5. Click Printer Driver to start the installer. IMPORTANT: One or more screens may show the KODAK Photo Printer 8800. The KODAK PROFESSIONAL 9810 Digital Photo Printer will still install correctly. Continue as directed on the screens. 6. Follow the on-screen instructions to install the printer driver and the Diagnostic tool. The printer driver and Diagnostic tool (see Page 5-1) will be installed. 7. Press the power switch to on ( | ) to turn on the printer. Borderless Printing For borderless printing, set the size of the image as follows: Page Size Image Size 8 x 10 8.213 (20.86 cm) x 10.08 in. (25.60 cm) at 300 DPI (or 2464 x 3024 pixels) 8 x 12 8.213 (20.86 cm) x 12.08 in. (30.68 cm) at 300 DPI (or 2464 x 3624 pixels) There are several ways to achieve this such as: • Crop or resize the image to one of the image sizes shown above. • Set scaling to 103% (using the printer driver's Properties / Advanced option). • Use the Scale to Fill option if your application supports this feature. 2-2
-
 1
1 -
2
-
3
-
4
-
5
-
6
-
7
-
8
-
9
-
10
-
 11
11 -
 12
12 -
 13
13 -
 14
14 -
 15
15 -
 16
16 -
 17
17 -
 18
18 -
 19
19 -
 20
20 -
 21
21 -
22
-
23
-
24
-
25
-
26
-
27
-
28
-
29
-
30
-
31
-
32
-
33
-
34
-
35
-
36
-
37
-
38
-
39
-
40
-
41
-
42
-
43
-
44
-
45
-
46
-
47
-
48
-
49
-
50
-
51
-
52
 |
 |