Kodak 9810 User Guide - Page 41
Update, Print, Repeat Steps
 |
UPC - 041778939178
View all Kodak 9810 manuals
Add to My Manuals
Save this manual to your list of manuals |
Page 41 highlights
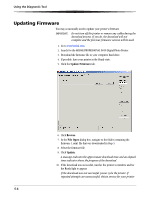
Using the Diagnostic Tool Cutter offset Page offset 5. Place the two prints together and note the number closest to the following occurrences: • Cutter offset: the point at which the cut intersects the horizontal line • Page offset: the point at which the right side of the page intersects the vertical line 6. Enter the Cutter offset and Page offset values. Click Update. 7. Click Print to print another test page and verify the settings. 8. Repeat Steps 2 - 7, if necessary. NOTE: Ideally the cutter offset and the page offset should be at zero. 5-3
-
 1
1 -
2
-
3
-
4
-
5
-
6
-
7
-
8
-
9
-
10
-
11
-
12
-
13
-
14
-
15
-
16
-
17
-
18
-
19
-
20
-
21
-
22
-
23
-
24
-
25
-
26
-
27
-
28
-
29
-
30
-
31
-
32
-
33
-
34
-
35
-
 36
36 -
 37
37 -
 38
38 -
 39
39 -
 40
40 -
 41
41 -
 42
42 -
 43
43 -
 44
44 -
 45
45 -
 46
46 -
47
-
48
-
49
-
50
-
51
-
52
 |
 |

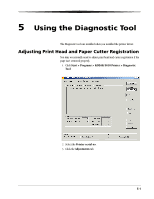
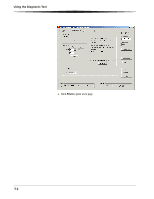
Using the Diagnostic Tool
5-3
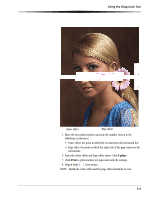
5.
Place the two prints together and note the number closest to the
following occurrences:
•
Cutter offset: the point at which the cut intersects the horizontal line
•
Page offset: the point at which the right side of the page intersects the
vertical line
6.
Enter the Cutter offset and Page offset values. Click
Update
.
7.
Click
Print
to print another test page and verify the settings.
8.
Repeat Steps
2
-
7
, if necessary.
NOTE:
Ideally the cutter offset and the page offset should be at zero.
Cutter offset
Page offset