Kodak DX6490 User Manual - Page 57
Taking Videos, Taking a Video
 |
UPC - 041778500286
View all Kodak DX6490 manuals
Add to My Manuals
Save this manual to your list of manuals |
Page 57 highlights
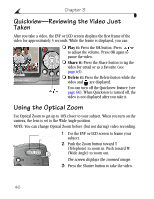
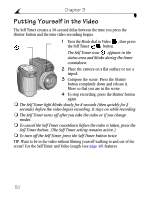
3 Taking Videos Use Video mode to take videos or to customize video-taking settings. Flash is not available in Video mode . NOTE: You can set Optical Zoom before (but not during) video recording. Taking a Video 1 Turn the Mode dial to Video . A live image, camera status, and the recording time available appear on the EVF or LCD screen. 2 Use the EVF or LCD screen to frame your subject. (Press the EVF/LCD button to switch to the other screen. See page 7.) 3 To begin recording, press the Shutter button completely down and release within 2 seconds. During recording, REC blinks on the screen and the elapsed time is displayed. 4 To stop recording, press the Shutter button again. Recording also stops if the storage location is full. The time display turns red when the available time reaches 10 seconds. See page 114 for video storage capacities. NOTE: If you prefer, press the Shutter button completely down and hold it for more than 2 seconds to begin recording. To stop recording, release the Shutter button. 45
-
 1
1 -
2
-
3
-
4
-
5
-
6
-
7
-
8
-
9
-
10
-
11
-
12
-
13
-
14
-
15
-
16
-
17
-
18
-
19
-
20
-
21
-
22
-
23
-
24
-
25
-
26
-
27
-
28
-
29
-
30
-
31
-
32
-
33
-
34
-
35
-
36
-
37
-
38
-
39
-
40
-
41
-
42
-
43
-
44
-
45
-
46
-
47
-
48
-
49
-
50
-
51
-
 52
52 -
 53
53 -
 54
54 -
 55
55 -
 56
56 -
 57
57 -
 58
58 -
 59
59 -
 60
60 -
 61
61 -
 62
62 -
63
-
64
-
65
-
66
-
67
-
68
-
69
-
70
-
71
-
72
-
73
-
74
-
75
-
76
-
77
-
78
-
79
-
80
-
81
-
82
-
83
-
84
-
85
-
86
-
87
-
88
-
89
-
90
-
91
-
92
-
93
-
94
-
95
-
96
-
97
-
98
-
99
-
100
-
101
-
102
-
103
-
104
-
105
-
106
-
107
-
108
-
109
-
110
-
111
-
112
-
113
-
114
-
115
-
116
-
117
-
118
-
119
-
120
-
121
-
122
-
123
-
124
-
125
-
126
-
127
-
128
-
129
-
130
-
131
-
132
-
133
-
134
-
135
-
136
-
137
-
138
-
139
-
140
-
141
-
142
 |
 |
