Konica Minolta AccurioPrint C3070L AccurioPress C2070/C3080 Series Daily Maint - Page 78
Details of quality adjustment items, 3.6.1 Setting of the Custom Screen
 |
View all Konica Minolta AccurioPrint C3070L manuals
Add to My Manuals
Save this manual to your list of manuals |
Page 78 highlights
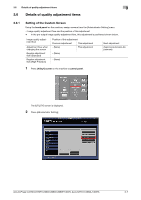
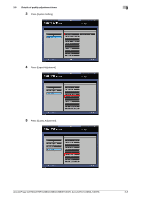
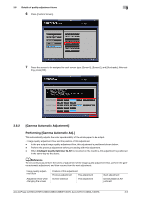
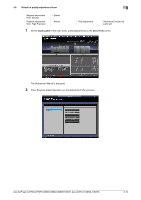
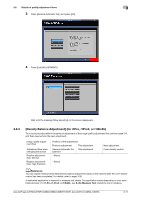
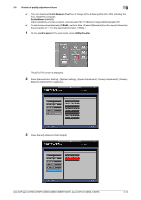
3.6 Details of quality adjustment items 3 3.6 Details of quality adjustment items 3.6.1 Setting of the Custom Screen Using the touch panel on the machine, assign screens from the [Administrator Setting] menu. . Image quality adjustment flow and the position of this adjustment - In the pre-output image quality adjustment flow, this adjustment is positioned shown below. Image quality adjustment flow Adjustment flow when changing the screen Regular adjustment flow (Standard) Regular adjustment flow (High Precision) Position of this adjustment Previous adjustment This adjustment - (None) This adjustment - (None) - (None) Next adjustment (Gamma Automatic Adjustment) 1 Press Utility/Counter on the machine's control panel. The [UTILITY] screen is displayed. 2 Press [Administrator Setting]. AccurioPress C2070/C2070P/C2060/C3080/C3080P/C3070, AccurioPrint C2060L/C3070L 3-7
-
 1
1 -
2
-
3
-
4
-
5
-
6
-
7
-
8
-
9
-
10
-
11
-
12
-
13
-
14
-
15
-
16
-
17
-
18
-
19
-
20
-
21
-
22
-
23
-
24
-
25
-
26
-
27
-
28
-
29
-
30
-
31
-
32
-
33
-
34
-
35
-
36
-
37
-
38
-
39
-
40
-
41
-
42
-
43
-
44
-
45
-
46
-
47
-
48
-
49
-
50
-
51
-
52
-
53
-
54
-
55
-
56
-
57
-
58
-
59
-
60
-
61
-
62
-
63
-
64
-
65
-
66
-
67
-
68
-
69
-
70
-
71
-
72
-
 73
73 -
 74
74 -
 75
75 -
 76
76 -
 77
77 -
 78
78 -
 79
79 -
 80
80 -
 81
81 -
 82
82 -
 83
83 -
84
-
85
-
86
-
87
-
88
-
89
-
90
-
91
-
92
-
93
-
94
-
95
-
96
-
97
-
98
-
99
-
100
-
101
-
102
-
103
-
104
-
105
-
106
-
107
-
108
-
109
-
110
-
111
-
112
-
113
-
114
-
115
-
116
-
117
-
118
-
119
-
120
-
121
-
122
-
123
-
124
-
125
-
126
-
127
-
128
-
129
-
130
-
131
-
132
-
133
-
134
-
135
-
136
-
137
-
138
-
139
-
140
-
141
-
142
-
143
-
144
-
145
-
146
-
147
-
148
-
149
-
150
-
151
-
152
-
153
-
154
-
155
-
156
-
157
-
158
-
159
-
160
-
161
-
162
-
163
-
164
-
165
-
166
-
167
-
168
-
169
-
170
-
171
-
172
-
173
-
174
-
175
-
176
-
177
-
178
 |
 |
