Konica Minolta Kodak i1860 User Guide - Page 13
Height Adjustment Wire, Service K-Number
 |
View all Konica Minolta Kodak i1860 manuals
Add to My Manuals
Save this manual to your list of manuals |
Page 13 highlights
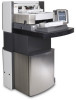
8 13 12 9 11 10 16 14 15 18 8 Service K-Number - the number on this sticker is the number you will be asked to provide when placing a call Kodak Service. 9 POD release latch - push up the POD release latch when you need to access the inside of the scanner. 10 Output tray and end stop - collects the scanned documents. The output tray width and end stop length can be adjusted. 11 Exit deflector - aids in document stacking. 12 Printer access cover - lift this cover to access the front printer for changing printer positions and maintenance. 13 Top access cover - lift this cover to access the rear printer for changing printer positions and maintenance. 14 Touchscreen - a variety of functions can be performed using the touchscreen. See Chapter 3, Using the Scanner for procedures on using these functions. If you need to move the scanner, the touchscreen can be rotated so it will easily fit through doorways or tight spaces. 15 LED - flashes green when the scanner is in Power Saver/Energy Star mode; LED is steady green when the scanner is idle and ready to scan. 16 Workspace table height adjustment switch - used to raise and lower the workspace table on the scanner. The workspace table can be raised or lowered approximately 10 inches up or down. 17 Height Adjustment Wire - located underneath the output tray (not shown in photo), this wire can be pulled out to raise the front of the output tray. 2-2 A-61555 March 2007
-
 1
1 -
2
-
3
-
4
-
5
-
6
-
7
-
 8
8 -
 9
9 -
 10
10 -
 11
11 -
 12
12 -
 13
13 -
 14
14 -
 15
15 -
 16
16 -
 17
17 -
 18
18 -
19
-
20
-
21
-
22
-
23
-
24
-
25
-
26
-
27
-
28
-
29
-
30
-
31
-
32
-
33
-
34
-
35
-
36
-
37
-
38
-
39
-
40
-
41
-
42
-
43
-
44
-
45
-
46
-
47
-
48
-
49
-
50
-
51
-
52
-
53
-
54
-
55
-
56
-
57
-
58
-
59
-
60
-
61
-
62
-
63
-
64
-
65
-
66
-
67
-
68
-
69
-
70
-
71
-
72
-
73
-
74
-
75
-
76
-
77
-
78
-
79
-
80
-
81
-
82
-
83
-
84
-
85
-
86
-
87
-
88
-
89
-
90
-
91
-
92
-
93
-
94
-
95
-
96
-
97
-
98
-
99
-
100
-
101
 |
 |
