Konica Minolta Kodak i1860 User Guide - Page 21
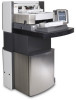
Adjusting the input elevator, Adjusting the side guides, Selecting your feeding position
 |
View all Konica Minolta Kodak i1860 manuals
Add to My Manuals
Save this manual to your list of manuals |
Page 21 highlights
Adjusting the input elevator Adjusting the side guides 1. Place the documents in the input elevator. 2. Adjust the side guides to fit the documents. The side guides should be far enough apart to accommodate the widest document that you are feeding. Selecting your feeding position Locking the side guides The side guides can be adjusted for right-edge, left-edge or center feeding. The side guides can be moved together for center feeding or independently for offset feeding (right-edge or left-edge). When using the Enhanced Printer, documents should be placed in the input elevator in a manner that will align the print string in the proper location. Offset feeding may be required. If your stack of documents contain mixed sizes and has been left- or right-edge aligned, adjust the side guides for offset feeding. Side guides may be locked into position after they are adjusted. This may be helpful when the placement of print strings is important. If you want to lock the side guides into position, move any documents which may be in the input tray and move the locking switch into the locked position. A-61555 March 2007 3-5
-
 1
1 -
2
-
3
-
4
-
5
-
6
-
7
-
8
-
9
-
10
-
11
-
12
-
13
-
14
-
15
-
 16
16 -
 17
17 -
 18
18 -
 19
19 -
 20
20 -
 21
21 -
 22
22 -
 23
23 -
 24
24 -
 25
25 -
 26
26 -
27
-
28
-
29
-
30
-
31
-
32
-
33
-
34
-
35
-
36
-
37
-
38
-
39
-
40
-
41
-
42
-
43
-
44
-
45
-
46
-
47
-
48
-
49
-
50
-
51
-
52
-
53
-
54
-
55
-
56
-
57
-
58
-
59
-
60
-
61
-
62
-
63
-
64
-
65
-
66
-
67
-
68
-
69
-
70
-
71
-
72
-
73
-
74
-
75
-
76
-
77
-
78
-
79
-
80
-
81
-
82
-
83
-
84
-
85
-
86
-
87
-
88
-
89
-
90
-
91
-
92
-
93
-
94
-
95
-
96
-
97
-
98
-
99
-
100
-
101
 |
 |
