Konica Minolta Kodak i1860 User Guide - Page 26
When finished using the output tray in this position, tuck the height
 |
View all Konica Minolta Kodak i1860 manuals
Add to My Manuals
Save this manual to your list of manuals |
Page 26 highlights
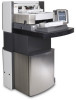
2. Swing the height adjustment wire out from underneath the output tray and insert it into one of the grooves on the printer access cover. 3. When finished using the output tray in this position, tuck the height adjustment wire back into position and lower the output tray. 3-10 A-61555 March 2007
-
 1
1 -
2
-
3
-
4
-
5
-
6
-
7
-
8
-
9
-
10
-
11
-
12
-
13
-
14
-
15
-
16
-
17
-
18
-
19
-
20
-
 21
21 -
 22
22 -
 23
23 -
 24
24 -
 25
25 -
 26
26 -
 27
27 -
 28
28 -
 29
29 -
 30
30 -
 31
31 -
32
-
33
-
34
-
35
-
36
-
37
-
38
-
39
-
40
-
41
-
42
-
43
-
44
-
45
-
46
-
47
-
48
-
49
-
50
-
51
-
52
-
53
-
54
-
55
-
56
-
57
-
58
-
59
-
60
-
61
-
62
-
63
-
64
-
65
-
66
-
67
-
68
-
69
-
70
-
71
-
72
-
73
-
74
-
75
-
76
-
77
-
78
-
79
-
80
-
81
-
82
-
83
-
84
-
85
-
86
-
87
-
88
-
89
-
90
-
91
-
92
-
93
-
94
-
95
-
96
-
97
-
98
-
99
-
100
-
101
 |
 |

3-10
A-61555
March 2007
2.
Swing the height adjustment wire out from underneath the output
tray and insert it into one of the grooves on the printer access cover.
3.
When finished using the output tray in this position, tuck the height
adjustment wire back into position and lower the output tray.