Konica Minolta bizhub 161f bizhub 161f User Guide - Page 204
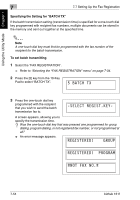
Specifying the Setting for “MAILBOX”, To register a mailbox, the new number.
 |
View all Konica Minolta bizhub 161f manuals
Add to My Manuals
Save this manual to your list of manuals |
Page 204 highlights
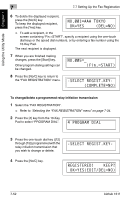
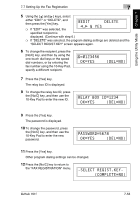
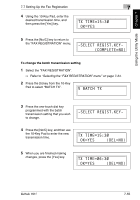
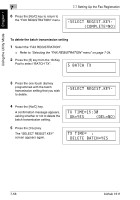
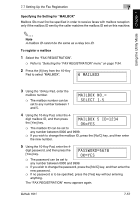
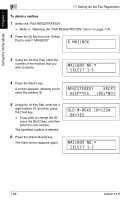
Using the Utility Mode Chapter 7 7.7 Setting Up the Fax Registration 7 Specifying the Setting for "MAILBOX" Mailbox IDs must first be specified in order to receive faxes with mailbox reception only if the mailbox ID sent by the caller matches the mailbox ID set on this machine. ✎ Note A mailbox ID cannot be the same as a relay box ID. To register a mailbox 1 Select the "FAX REGISTRATION". ❍ Refer to "Selecting the "FAX REGISTRATION" menu" on page 7-34. 2 Press the [6] key from the 10-Key Pad to select "MAILBOX". 3 Using the 10-Key Pad, enter the mailbox number. ❍ The mailbox number can be set to any number between 1 and 5. 4 Using the 10-Key Pad, enter the 4- digit mailbox ID, and then press the [Yes] key. ❍ The mailbox ID can be set to any number between 0000 and 9999. ❍ If you wish to change the mailbox ID, press the [No/C] key, and then enter the new number. 5 Using the 10-Key Pad, enter the 4- digit password, and then press the [Yes] key. ❍ The password can be set to any number between 0000 and 9999. ❍ If you wish to change the password, press the [No/C] key, and then enter the new password. ❍ If no password is to be specified, press the [Yes] key without entering anything. The "FAX REGISTRATION" menu appears again. bizhub 161f 7-57
-
 1
1 -
2
-
3
-
4
-
5
-
6
-
7
-
8
-
9
-
10
-
11
-
12
-
13
-
14
-
15
-
16
-
17
-
18
-
19
-
20
-
21
-
22
-
23
-
24
-
25
-
26
-
27
-
28
-
29
-
30
-
31
-
32
-
33
-
34
-
35
-
36
-
37
-
38
-
39
-
40
-
41
-
42
-
43
-
44
-
45
-
46
-
47
-
48
-
49
-
50
-
51
-
52
-
53
-
54
-
55
-
56
-
57
-
58
-
59
-
60
-
61
-
62
-
63
-
64
-
65
-
66
-
67
-
68
-
69
-
70
-
71
-
72
-
73
-
74
-
75
-
76
-
77
-
78
-
79
-
80
-
81
-
82
-
83
-
84
-
85
-
86
-
87
-
88
-
89
-
90
-
91
-
92
-
93
-
94
-
95
-
96
-
97
-
98
-
99
-
100
-
101
-
102
-
103
-
104
-
105
-
106
-
107
-
108
-
109
-
110
-
111
-
112
-
113
-
114
-
115
-
116
-
117
-
118
-
119
-
120
-
121
-
122
-
123
-
124
-
125
-
126
-
127
-
128
-
129
-
130
-
131
-
132
-
133
-
134
-
135
-
136
-
137
-
138
-
139
-
140
-
141
-
142
-
143
-
144
-
145
-
146
-
147
-
148
-
149
-
150
-
151
-
152
-
153
-
154
-
155
-
156
-
157
-
158
-
159
-
160
-
161
-
162
-
163
-
164
-
165
-
166
-
167
-
168
-
169
-
170
-
171
-
172
-
173
-
174
-
175
-
176
-
177
-
178
-
179
-
180
-
181
-
182
-
183
-
184
-
185
-
186
-
187
-
188
-
189
-
190
-
191
-
192
-
193
-
194
-
195
-
196
-
197
-
198
-
 199
199 -
 200
200 -
 201
201 -
 202
202 -
 203
203 -
 204
204 -
 205
205 -
 206
206 -
 207
207 -
 208
208 -
 209
209 -
210
-
211
-
212
-
213
-
214
-
215
-
216
-
217
-
218
-
219
-
220
-
221
-
222
-
223
-
224
-
225
-
226
-
227
-
228
-
229
-
230
-
231
-
232
-
233
-
234
-
235
-
236
-
237
-
238
-
239
-
240
-
241
-
242
-
243
-
244
-
245
-
246
-
247
-
248
-
249
-
250
-
251
-
252
-
253
-
254
-
255
-
256
-
257
-
258
-
259
-
260
-
261
-
262
-
263
-
264
-
265
-
266
-
267
-
268
-
269
-
270
-
271
-
272
-
273
-
274
-
275
-
276
-
277
-
278
-
279
-
280
-
281
-
282
-
283
-
284
 |
 |
