Konica Minolta bizhub 20 bizhub 20 User Guide - Page 125
File and Printer Sharing, Network and Internet
 |
View all Konica Minolta bizhub 20 manuals
Add to My Manuals
Save this manual to your list of manuals |
Page 125 highlights
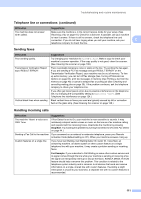
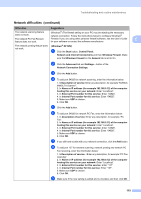
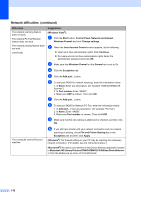
Network difficulties (continued) Difficulties The network scanning feature does not work. The network PC Fax Receive feature does not work. The network printing feature does not work. (continued) Suggestions (Windows Vista®): a Click the Start button, Control Panel, Network and Internet, Windows Firewall and click Change settings. b When the User Account Control screen appears, do the following. Users who have administrator rights: Click Continue. For users who do not have administrator rights: Enter the administrator password and click OK. c Make sure that Windows Firewall on the General tab is set to On. d Click the Exceptions tab. e Click the Add port... button. f To add port 54925 for network scanning, enter the information below: 1. In Name: Enter any description. (for example "KONICA MINOLTA Scanner") 2. In Port number: Enter "54925". 3. Make sure UDP is chosen. Then click OK. g Click the Add port... button. h To add port 54926 for Network PC Fax, enter the information below: 1. In Add port... Enter any description. (for example "PC Fax") 2. In Name: Enter "54926". 3. Make sure Port number: is chosen. Then click UDP. i Make sure that the new setting is added and is checked, and then click OK. Your computer cannot find your machine. j If you still have trouble with your network connection such as network scanning or printing, check File and Printer Sharing box in the Exceptions tab and then click Apply. (Windows®) The firewall setting on your PC may be rejecting the necessary network connection. (For details, see the instructions above.) (Macintosh®) Re-select your machine in the Device Selector application located in Macintosh HD/Library/Printers/KONICA MINOLTA/Utilities/DeviceSelector or from the Model pop-up menu of ControlCenter2. 116
-
 1
1 -
2
-
3
-
4
-
5
-
6
-
7
-
8
-
9
-
10
-
11
-
12
-
13
-
14
-
15
-
16
-
17
-
18
-
19
-
20
-
21
-
22
-
23
-
24
-
25
-
26
-
27
-
28
-
29
-
30
-
31
-
32
-
33
-
34
-
35
-
36
-
37
-
38
-
39
-
40
-
41
-
42
-
43
-
44
-
45
-
46
-
47
-
48
-
49
-
50
-
51
-
52
-
53
-
54
-
55
-
56
-
57
-
58
-
59
-
60
-
61
-
62
-
63
-
64
-
65
-
66
-
67
-
68
-
69
-
70
-
71
-
72
-
73
-
74
-
75
-
76
-
77
-
78
-
79
-
80
-
81
-
82
-
83
-
84
-
85
-
86
-
87
-
88
-
89
-
90
-
91
-
92
-
93
-
94
-
95
-
96
-
97
-
98
-
99
-
100
-
101
-
102
-
103
-
104
-
105
-
106
-
107
-
108
-
109
-
110
-
111
-
112
-
113
-
114
-
115
-
116
-
117
-
118
-
119
-
 120
120 -
 121
121 -
 122
122 -
 123
123 -
 124
124 -
 125
125 -
 126
126 -
 127
127 -
 128
128 -
 129
129 -
 130
130 -
131
-
132
-
133
-
134
-
135
-
136
-
137
-
138
-
139
-
140
-
141
-
142
-
143
-
144
-
145
-
146
-
147
-
148
-
149
-
150
-
151
-
152
-
153
-
154
-
155
-
156
-
157
-
158
-
159
-
160
-
161
-
162
-
163
-
164
-
165
-
166
-
167
-
168
-
169
-
170
-
171
-
172
-
173
-
174
-
175
-
176
-
177
-
178
-
179
-
180
-
181
-
182
-
183
-
184
-
185
-
186
-
187
-
188
-
189
-
190
-
191
-
192
-
193
-
194
-
195
-
196
-
197
-
198
-
199
-
200
-
201
-
202
-
203
 |
 |
