Konica Minolta bizhub 287 bizhub 287/227 Quick Start Guide - Page 200
Konica Minolta bizhub 287 Manual
 |
View all Konica Minolta bizhub 287 manuals
Add to My Manuals
Save this manual to your list of manuals |
Page 200 highlights
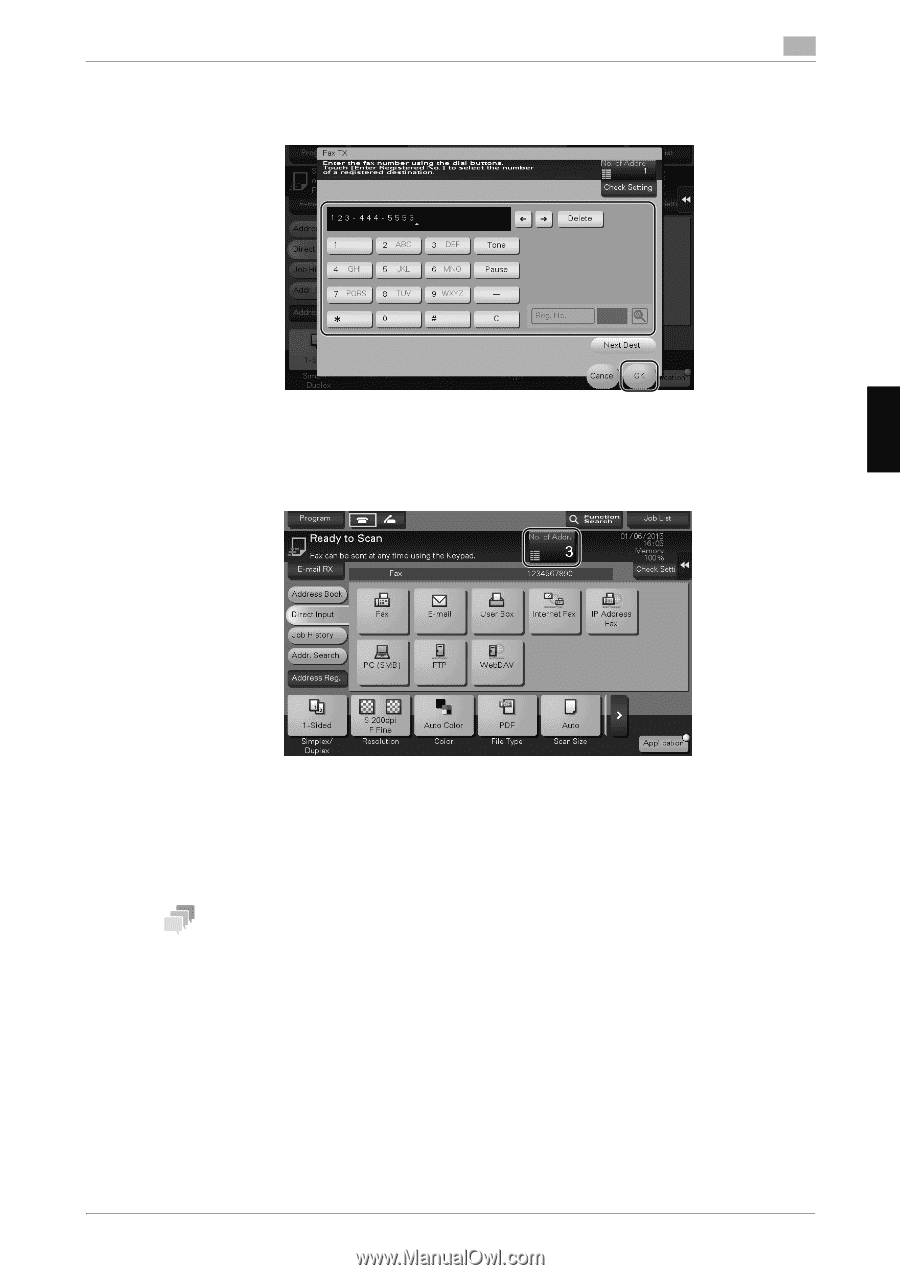
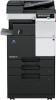
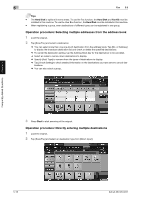
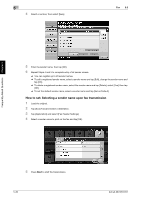
5.3 Fax 5 3 Enter a destination, then tap [OK]. % Tap [Next Dest.] on the address input screen to continue address entry (not enabled for a User Box). Frequently Asked Questions Chapter 5 4 Repeat steps 2 and 3 to complete entry of all destinations. [No. of Address] displays the number of entered destinations. % Tap [Check Setting] to check detailed information on the destinations you have entered or to cancel destinations. 5 Press Start to start scanning of the original. 5.3.3 Q3. Can I register more than one sender name to appear on faxes so that different ones can be used in different use cases? A3. Yes, you can register multiple sender names and select one when sending a fax. Tips - The Hard Disk is optional in some areas. To use the Fax function, the Hard Disk and Fax Kit must be installed in this machine. How to set: Registering sender names 1 Tap [Utility], then select [Administrator Settings]. 2 Enter the password, then tap [OK]. 3 Select [Fax Settings] - [Header Information] - [Sender]. bizhub 367/287/227 5-19
-
 1
1 -
2
-
3
-
4
-
5
-
6
-
7
-
8
-
9
-
10
-
11
-
12
-
13
-
14
-
15
-
16
-
17
-
18
-
19
-
20
-
21
-
22
-
23
-
24
-
25
-
26
-
27
-
28
-
29
-
30
-
31
-
32
-
33
-
34
-
35
-
36
-
37
-
38
-
39
-
40
-
41
-
42
-
43
-
44
-
45
-
46
-
47
-
48
-
49
-
50
-
51
-
52
-
53
-
54
-
55
-
56
-
57
-
58
-
59
-
60
-
61
-
62
-
63
-
64
-
65
-
66
-
67
-
68
-
69
-
70
-
71
-
72
-
73
-
74
-
75
-
76
-
77
-
78
-
79
-
80
-
81
-
82
-
83
-
84
-
85
-
86
-
87
-
88
-
89
-
90
-
91
-
92
-
93
-
94
-
95
-
96
-
97
-
98
-
99
-
100
-
101
-
102
-
103
-
104
-
105
-
106
-
107
-
108
-
109
-
110
-
111
-
112
-
113
-
114
-
115
-
116
-
117
-
118
-
119
-
120
-
121
-
122
-
123
-
124
-
125
-
126
-
127
-
128
-
129
-
130
-
131
-
132
-
133
-
134
-
135
-
136
-
137
-
138
-
139
-
140
-
141
-
142
-
143
-
144
-
145
-
146
-
147
-
148
-
149
-
150
-
151
-
152
-
153
-
154
-
155
-
156
-
157
-
158
-
159
-
160
-
161
-
162
-
163
-
164
-
165
-
166
-
167
-
168
-
169
-
170
-
171
-
172
-
173
-
174
-
175
-
176
-
177
-
178
-
179
-
180
-
181
-
182
-
183
-
184
-
185
-
186
-
187
-
188
-
189
-
190
-
191
-
192
-
193
-
194
-
 195
195 -
 196
196 -
 197
197 -
 198
198 -
 199
199 -
 200
200 -
 201
201 -
 202
202 -
 203
203 -
 204
204 -
 205
205 -
206
-
207
-
208
-
209
-
210
-
211
-
212
-
213
-
214
-
215
-
216
-
217
-
218
-
219
-
220
-
221
-
222
-
223
-
224
-
225
-
226
-
227
-
228
-
229
-
230
-
231
-
232
-
233
-
234
-
235
-
236
-
237
-
238
-
239
-
240
-
241
-
242
-
243
-
244
-
245
-
246
 |
 |