Konica Minolta bizhub 601 bizhub 751/6510 Box Operations User Manual - Page 146
Printing, Deleting
 |
View all Konica Minolta bizhub 601 manuals
Add to My Manuals
Save this manual to your list of manuals |
Page 146 highlights
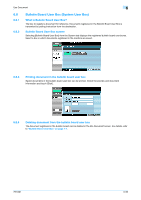
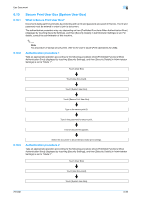
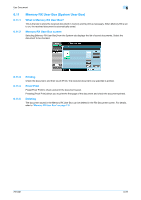
Use Document 6 Touch [Secure Print User Box]. Type in the secure print ID. A list of documents appears. 6.10.4 Select the document to be printed and type in the password for secure print. ! Detail When you select "Mode 2", the security level is higher than that in "Mode 1" because the password is to be entered after the document is selected. Printing You can add several functions to documents stored in secure print user box when you print them. 6.10.5 Copies Type in the desired number of print copies using the keypad. The input range is 1 to 9999. 1-Sided/2-Sided Select either 1-sided or 2-sided. Finishing For the setting procedure, refer to "Finishing" on page 6-5. Page Margin For the setting procedure, refer to "Page Margin" on page 6-9. Sheet/Cover/Chapter Insert For the setting procedure, refer to "Sheet/Cover/Chapter Insert" on page 6-10. Stamp/Composition For the setting procedure, refer to "Stamp/Composition" on page 6-15. Deleting The document saved in the secure print user box can be deleted in the File Document screen. For details, refer to "Secure Print User Box" on page 7-7. 751/601 6-56
-
 1
1 -
2
-
3
-
4
-
5
-
6
-
7
-
8
-
9
-
10
-
11
-
12
-
13
-
14
-
15
-
16
-
17
-
18
-
19
-
20
-
21
-
22
-
23
-
24
-
25
-
26
-
27
-
28
-
29
-
30
-
31
-
32
-
33
-
34
-
35
-
36
-
37
-
38
-
39
-
40
-
41
-
42
-
43
-
44
-
45
-
46
-
47
-
48
-
49
-
50
-
51
-
52
-
53
-
54
-
55
-
56
-
57
-
58
-
59
-
60
-
61
-
62
-
63
-
64
-
65
-
66
-
67
-
68
-
69
-
70
-
71
-
72
-
73
-
74
-
75
-
76
-
77
-
78
-
79
-
80
-
81
-
82
-
83
-
84
-
85
-
86
-
87
-
88
-
89
-
90
-
91
-
92
-
93
-
94
-
95
-
96
-
97
-
98
-
99
-
100
-
101
-
102
-
103
-
104
-
105
-
106
-
107
-
108
-
109
-
110
-
111
-
112
-
113
-
114
-
115
-
116
-
117
-
118
-
119
-
120
-
121
-
122
-
123
-
124
-
125
-
126
-
127
-
128
-
129
-
130
-
131
-
132
-
133
-
134
-
135
-
136
-
137
-
138
-
139
-
140
-
 141
141 -
 142
142 -
 143
143 -
 144
144 -
 145
145 -
 146
146 -
 147
147 -
 148
148 -
 149
149 -
 150
150 -
 151
151 -
152
-
153
-
154
-
155
-
156
-
157
-
158
-
159
-
160
-
161
-
162
-
163
-
164
-
165
-
166
-
167
-
168
-
169
-
170
-
171
-
172
-
173
-
174
-
175
-
176
-
177
-
178
-
179
-
180
-
181
-
182
-
183
-
184
-
185
-
186
-
187
-
188
-
189
-
190
-
191
-
192
-
193
-
194
-
195
-
196
-
197
-
198
-
199
-
200
-
201
-
202
-
203
-
204
-
205
-
206
-
207
-
208
-
209
-
210
-
211
-
212
-
213
-
214
-
215
-
216
-
217
-
218
-
219
-
220
-
221
-
222
-
223
-
224
-
225
-
226
-
227
-
228
-
229
-
230
-
231
-
232
-
233
-
234
-
235
-
236
-
237
-
238
 |
 |
