Konica Minolta bizhub 601 bizhub 751/6510 Box Operations User Manual - Page 34
Control panel - memory clear
 |
View all Konica Minolta bizhub 601 manuals
Add to My Manuals
Save this manual to your list of manuals |
Page 34 highlights
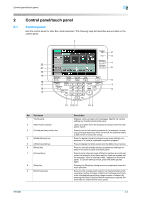
Control panel/touch panel 2 2 Control panel/touch panel 2.1 Control panel Use the control panel for User Box mode operation. The following keys and switches are provided on the control panel. 1 2 3 4 22 21 5 20 19 6 18 17 7 16 8 15 14 13 12 11 10 9 No. Part name 1 Touch panel 2 Main Power indicator 3 [Power] (auxiliary power) key 4 [Mode Memory] key 5 [Utility/Counter] key 6 [Reset] key 7 [Interrupt] key 8 [Stop] key 9 [Proof Copy] key Description Displays various screens and messages. Specify the various settings by directly touching the panel. Lights up in green when the machine is turned on with the main power switch. Press to turn on/off machine operations, for example, for copying, printing or scanning. When turned off, the machine enters a state where it conserves energy. Press to register (store) the desired copy/scan settings as a program or to recall a registered copy/scan program. Press to display the Utility screen and the Meter Count screen. Press to clear all settings (except programmed settings) entered in the control panel and touch panel. Press to enter Interrupt mode. While the machine is in Interrupt mode, the indicator on the [Interrupt] key lights up in green and the message "Now in Interrupt mode." appears on the touch panel. To cancel Interrupt mode, press the [Interrupt] key again. Pressing the [Stop] key during scanning temporarily stops the scan operation. Press to print a single proof copy to be checked before printing a large number of copies. Press to print a single proof copy to be checked before printing a large number of copies. By pressing the [Proof Copy] key before scanning or copying, the result can be viewed on the touch panel. 751/601 2-2
-
 1
1 -
2
-
3
-
4
-
5
-
6
-
7
-
8
-
9
-
10
-
11
-
12
-
13
-
14
-
15
-
16
-
17
-
18
-
19
-
20
-
21
-
22
-
23
-
24
-
25
-
26
-
27
-
28
-
 29
29 -
 30
30 -
 31
31 -
 32
32 -
 33
33 -
 34
34 -
 35
35 -
 36
36 -
 37
37 -
 38
38 -
 39
39 -
40
-
41
-
42
-
43
-
44
-
45
-
46
-
47
-
48
-
49
-
50
-
51
-
52
-
53
-
54
-
55
-
56
-
57
-
58
-
59
-
60
-
61
-
62
-
63
-
64
-
65
-
66
-
67
-
68
-
69
-
70
-
71
-
72
-
73
-
74
-
75
-
76
-
77
-
78
-
79
-
80
-
81
-
82
-
83
-
84
-
85
-
86
-
87
-
88
-
89
-
90
-
91
-
92
-
93
-
94
-
95
-
96
-
97
-
98
-
99
-
100
-
101
-
102
-
103
-
104
-
105
-
106
-
107
-
108
-
109
-
110
-
111
-
112
-
113
-
114
-
115
-
116
-
117
-
118
-
119
-
120
-
121
-
122
-
123
-
124
-
125
-
126
-
127
-
128
-
129
-
130
-
131
-
132
-
133
-
134
-
135
-
136
-
137
-
138
-
139
-
140
-
141
-
142
-
143
-
144
-
145
-
146
-
147
-
148
-
149
-
150
-
151
-
152
-
153
-
154
-
155
-
156
-
157
-
158
-
159
-
160
-
161
-
162
-
163
-
164
-
165
-
166
-
167
-
168
-
169
-
170
-
171
-
172
-
173
-
174
-
175
-
176
-
177
-
178
-
179
-
180
-
181
-
182
-
183
-
184
-
185
-
186
-
187
-
188
-
189
-
190
-
191
-
192
-
193
-
194
-
195
-
196
-
197
-
198
-
199
-
200
-
201
-
202
-
203
-
204
-
205
-
206
-
207
-
208
-
209
-
210
-
211
-
212
-
213
-
214
-
215
-
216
-
217
-
218
-
219
-
220
-
221
-
222
-
223
-
224
-
225
-
226
-
227
-
228
-
229
-
230
-
231
-
232
-
233
-
234
-
235
-
236
-
237
-
238
 |
 |
