Konica Minolta bizhub 601 bizhub 751/601 Fax Driver Operations User Manual - Page 19
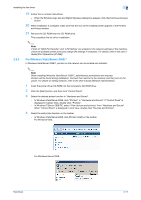
Specifying the Con tab settings on Settings - review
 |
View all Konica Minolta bizhub 601 manuals
Add to My Manuals
Save this manual to your list of manuals |
Page 19 highlights
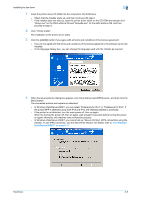
Installing the fax driver 2 9 In the Finish Installing Drivers dialog box, click the [Finish] button. This completes the fax driver installation. 2 Note In the Finish Installing Drivers dialog box, installation items can be confirmed and settings can be changed. [Review]: Check the installation settings. [Rename Printer]: Change the printer name. [Property]: Specify the property settings of the fax driver. For details,refer to "Specifying the Configure tab settings" on page 3-18. [Print Setting]: Specify the functions of the fax driver. For details, refer to "Settings" on page 3-8. [Print Test Page]: Perform test print. Fax Driver 2-7
-
 1
1 -
2
-
3
-
4
-
5
-
6
-
7
-
8
-
9
-
10
-
11
-
12
-
13
-
 14
14 -
 15
15 -
 16
16 -
 17
17 -
 18
18 -
 19
19 -
 20
20 -
 21
21 -
 22
22 -
 23
23 -
 24
24 -
25
-
26
-
27
-
28
-
29
-
30
-
31
-
32
-
33
-
34
-
35
-
36
-
37
-
38
-
39
-
40
-
41
-
42
-
43
-
44
-
45
-
46
-
47
-
48
-
49
-
50
-
51
-
52
-
53
-
54
-
55
-
56
-
57
-
58
-
59
-
60
-
61
-
62
-
63
-
64
-
65
-
66
-
67
-
68
-
69
 |
 |

Fax Driver
2-7
Installing the fax driver
2
9
In the Finish Installing Drivers dialog box, click the [Finish] button.
This completes the fax driver installation.
2
Note
In the Finish Installing Drivers dialog box, installation items can be confirmed and settings can be
changed.
[Review]: Check the installation settings.
[Rename Printer]: Change the printer name.
[Property]: Specify the property settings of the fax driver. For details,refer to
"Specifying the Configure
tab settings" on page 3-18
.
[Print Setting]: Specify the functions of the fax driver. For details, refer to
"Settings" on page 3-8
.
[Print Test Page]: Perform test print.