Konica Minolta bizhub 601 bizhub 751/601 Enlarge Display Operations User Manua - Page 74
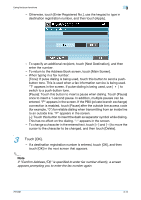
Touch [OK]., If Confirm Address TX is specified to enter fax number directly, a screen - push scanning
 |
View all Konica Minolta bizhub 601 manuals
Add to My Manuals
Save this manual to your list of manuals |
Page 74 highlights
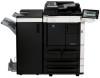
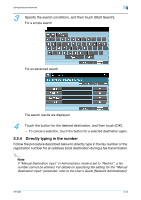
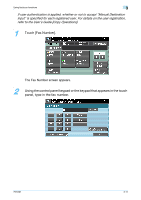
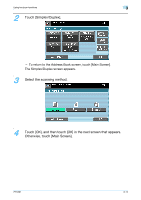
Using fax/scan functions 3 - Otherwise, touch [Enter Registered No.], use the keypad to type in destination registration number, and then touch [Apply]. - To specify an additional recipient, touch [Next Destination], and then enter the number. - To return to the Address Book screen, touch [Main Screen]. - When typing in a fax number: [Tone]: If pulse dialing is being used, touch this button to send a pushbutton tone. This is used when a fax information service is being used. "T" appears in the screen. If pulse dialing is being used, use [ ] to switch to a push-button tone. [Pause]: Touch this button to insert a pause when dialing. Touch [Pause] once to insert a 1-second pause. In addition, multiple pauses can be entered. "P" appears in the screen. If the PBX (private branch exchange) connection is enabled, touch [Pause] after the outside line access code (for example, "0") for reliable dialing when transmitting from an inside line to an outside line. "P" appears in the screen. [-]: Touch this button to insert the dash as separator symbol while dialing. This has no effect on the dialing. "-" appears in the screen. - To change a character in the entered text, touch [←] and [→] to move the cursor to the character to be changed, and then touch [Delete]. 3 Touch [OK]. - If a destination registration number is entered, touch [OK], and then touch [OK] in the next screen that appears. 2 Note If "Confirm Address (TX)" is specified to enter fax number directly, a screen appears prompting you to enter the fax number again. 751/601 3-12
-
 1
1 -
2
-
3
-
4
-
5
-
6
-
7
-
8
-
9
-
10
-
11
-
12
-
13
-
14
-
15
-
16
-
17
-
18
-
19
-
20
-
21
-
22
-
23
-
24
-
25
-
26
-
27
-
28
-
29
-
30
-
31
-
32
-
33
-
34
-
35
-
36
-
37
-
38
-
39
-
40
-
41
-
42
-
43
-
44
-
45
-
46
-
47
-
48
-
49
-
50
-
51
-
52
-
53
-
54
-
55
-
56
-
57
-
58
-
59
-
60
-
61
-
62
-
63
-
64
-
65
-
66
-
67
-
68
-
 69
69 -
 70
70 -
 71
71 -
 72
72 -
 73
73 -
 74
74 -
 75
75 -
 76
76 -
 77
77 -
 78
78 -
 79
79 -
80
-
81
-
82
-
83
-
84
-
85
-
86
-
87
-
88
-
89
-
90
-
91
-
92
-
93
-
94
-
95
-
96
-
97
-
98
-
99
-
100
-
101
 |
 |