Konica Minolta bizhub 601 bizhub 751/601 Enlarge Display Operations User Manua - Page 86
Original Settings, Touch [OK], and then touch [OK] in the next screen that appears.
 |
View all Konica Minolta bizhub 601 manuals
Add to My Manuals
Save this manual to your list of manuals |
Page 86 highlights
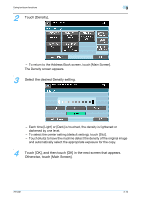
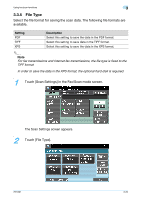
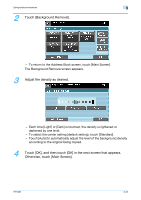
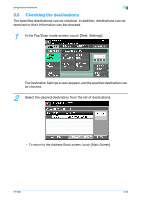
Using fax/scan functions 3 - To return to the Address Book screen, touch [Main Screen]. The Scan Size screen appears. 3 Select the desired size and orientation. - If [Metric Sizes], [Inch Sizes] or [Other] was touched, select the desired paper size, and then touch [OK]. - To scan the entire page of the original, touch [Full Bleed Scan]. 4 Touch [OK], and then touch [OK] in the next screen that appears. Otherwise, touch [Main Screen]. 3.3.8 Original Settings Select the binding position and orientation of the original. Parameter Original Direction Binding Position Description Select the orientation of the original. After the original is scanned, the data is processed so that it is correctly oriented. For details on selecting the original orientation, refer to "Selecting the original orientation (Original Direction settings)" on page 1-17. Select the binding position, for example, when holes are punched in the original or the original is stapled. In addition, specify the binding position when a double-sided original is loaded. This adjusts the scan of double-sided originals so that the binding position is not reversed. Left: Select this setting for an original with a binding margin on the left side. Top: Select this setting for an original with a binding margin at the top. Auto: The binding margin is on the long side if the page is 11-11/ 16 inch (297 mm) or less, or it is on the short side if the page is more than 11-11/16 inch (297 mm). 751/601 3-24
-
 1
1 -
2
-
3
-
4
-
5
-
6
-
7
-
8
-
9
-
10
-
11
-
12
-
13
-
14
-
15
-
16
-
17
-
18
-
19
-
20
-
21
-
22
-
23
-
24
-
25
-
26
-
27
-
28
-
29
-
30
-
31
-
32
-
33
-
34
-
35
-
36
-
37
-
38
-
39
-
40
-
41
-
42
-
43
-
44
-
45
-
46
-
47
-
48
-
49
-
50
-
51
-
52
-
53
-
54
-
55
-
56
-
57
-
58
-
59
-
60
-
61
-
62
-
63
-
64
-
65
-
66
-
67
-
68
-
69
-
70
-
71
-
72
-
73
-
74
-
75
-
76
-
77
-
78
-
79
-
80
-
 81
81 -
 82
82 -
 83
83 -
 84
84 -
 85
85 -
 86
86 -
 87
87 -
 88
88 -
 89
89 -
 90
90 -
 91
91 -
92
-
93
-
94
-
95
-
96
-
97
-
98
-
99
-
100
-
101
 |
 |
