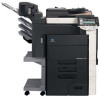
Konica Minolta bizhub C451 Email Setup Instructions - Page 5
D. Check Date and Time in Administrator Mode, E. Configuring MFP for One-Way SMTP only Communication
 |
View all Konica Minolta bizhub C451 manuals
Add to My Manuals
Save this manual to your list of manuals |
Page 5 highlights
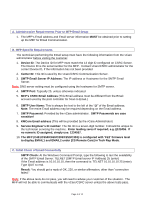
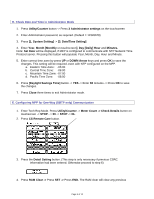
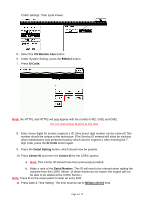
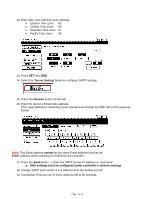
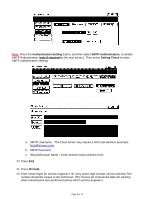
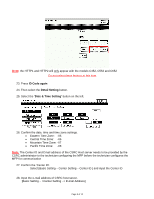
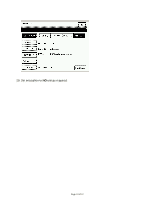
D. Check Date and Time in Administrator Mode 1. Press Utility/Counter button -> Press 3 Administrator settings on the touchscreen 2. Enter Administrator password, as required. (Default = 12345678) 3. Press [1. System Setting] -> [3. Date/Time Setting] 4. Enter Year, Month [Monthly on touchscreen], Day [Daily] Hour and Minutes. Note: Set Date will be displayed, if MFP is configured to communicate with NTP Network Time Protocol server. Pressing this button will populate Year, Month, Day, Hour and Minute. 5. Enter correct time zone by press UP or DOWN Arrow keys and press OK to save the changes. This setting will be required, even with NTP configured on the MFP. a. Eastern Time Zone: -05:00 b. Central Time Zone: -06:00 c. Mountain Time Zone: -07:00 d. Pacific Time Zone: -08:00 6. Press [Daylight Savings Time] button -> YES -> Enter 60 minutes -> Press OK to save the changes. 7. Press Close three times to exit Administrator mode. E. Configuring MFP for One-Way (SMTP only) Communication 1. Enter Tech Rep Mode. Press Utility/Counter -> Meter Count -> Check Details button on touchscreen -> STOP - > 00 -> STOP -> 01. 2. Press CS Remote Care button. 3. Press the Detail Setting button. (This step is only necessary if previous CSRC information had been entered. Otherwise proceed to step 6) 4. Press RAM Clear -> Press SET -> Press END. The RAM clear will clear any previous Page 5 of 12
-
 1
1 -
 2
2 -
 3
3 -
 4
4 -
 5
5 -
 6
6 -
 7
7 -
 8
8 -
 9
9 -
 10
10 -
 11
11 -
12
 |
 |
