LG 42LP1D Owner's Manual - Page 36
Ieee 1394 - not working
 |
View all LG 42LP1D manuals
Add to My Manuals
Save this manual to your list of manuals |
Page 36 highlights
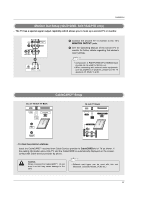
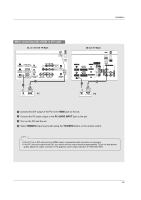
Installation IEEE 1394 - It's available to communicate to either direction and you can give and take a image, sound, or each control command with one cable. How to connect the 1394 • To operate the IEEE1394, these methods are available as shown below. (a) TV DVHS TV (b) TV TV Connect the IEEE1394 Cable DVHS MicroMV Camcorder Connect the IEEE1394 Cable MicroMV Camcorder 1 When connecting the DVHS or the MicroMV Camcorder, as shown in the (a) or (b) figure, press the 1394 button to show the control panel. Note: When connecting the DVHS and the MicroMV Camcorder, in case of showing 'input error' on the MicroMV Camcorder window, it's okay. (c) TV DVHS + MicroMV Camcorder Connect the IEEE1394 Cable DVHS TV MicroMV Camcorder 2 When connecting the DVHS and the MicroMV Camcorder, as shown in the (c) or (d) figure, press the 1394 button to show the control panel and then select the DVHS or the MicroMV Camcorder. - When connecting the 1394 and then playing, you must use the original DVHS tape. If not, it may occur errors. - If the operation normally doesn't work on Daisy Chain connection, please change an arrangement of connected device. Connect the IEEE1394 Cable (d) Daisy Chain Connection Connect the IEEE1394 Cable Connect the IEEE1394 Cable DVHS MicroMV Camcorder TV Connect the IEEE1394 Cable Generic 36
-
 1
1 -
2
-
3
-
4
-
5
-
6
-
7
-
8
-
9
-
10
-
11
-
12
-
13
-
14
-
15
-
16
-
17
-
18
-
19
-
20
-
21
-
22
-
23
-
24
-
25
-
26
-
27
-
28
-
29
-
30
-
 31
31 -
 32
32 -
 33
33 -
 34
34 -
 35
35 -
 36
36 -
 37
37 -
 38
38 -
 39
39 -
 40
40 -
 41
41 -
42
-
43
-
44
-
45
-
46
-
47
-
48
-
49
-
50
-
51
-
52
-
53
-
54
-
55
-
56
-
57
-
58
-
59
-
60
-
61
-
62
-
63
-
64
-
65
-
66
-
67
-
68
-
69
-
70
-
71
-
72
-
73
-
74
-
75
-
76
-
77
-
78
-
79
-
80
-
81
-
82
-
83
-
84
-
85
-
86
-
87
-
88
-
89
-
90
-
91
-
92
-
93
-
94
-
95
-
96
-
97
-
98
-
99
-
100
-
101
-
102
-
103
-
104
-
105
-
106
-
107
-
108
-
109
-
110
-
111
-
112
-
113
-
114
-
115
-
116
 |
 |
