LG DLG2532W Owners Manual - Page 9
Heat Source, Check - no heat
 |
View all LG DLG2532W manuals
Add to My Manuals
Save this manual to your list of manuals |
Page 9 highlights
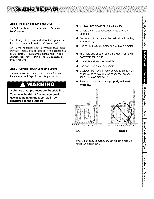
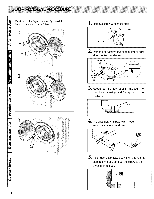
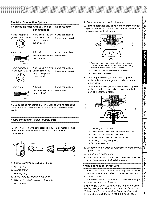
Step 4: (Electric Dryer Only) Connect Electrical Plug For furlher assistance refer to section on Electrical Requirements. IMPORTANT : U_ only a new U.L. li_t,d No. 10 (copper wire only) three conductor _)wer supply cord kit rat,._'l 240 Volts (minimum)30 Amper¢_ and labeled a:ssuitable for use in a clothes dryer. NOTE : For more de_iled information on conn_ction three=wire or four-wire plugs, refer to s_etion on Fdectric Dryer Fdectrical Requirements. NOTE : Four-wire cord is required for nmbile homes or where c_'les do not __it grounding Step 5: Wipe Out Inside of Dryer Belbre using dryer for the fi_t timc, use an all-purpo_ clcancr, or a detc_Nent and water _lufion, and a damp cloth to remove shipping dust from inside the drycr drt|lll. Step 6: Plug In the Dryer Refer to section on Electrical Requirements, ;rod COlmect the dryer to an electrical l_)wer sxmrce. Heat Source Check El_tric Dryers Close the loading door and start the dryer in a heat setting (ml_r to the ()perating Inslructions suppli_ with the dryer). After the d_'cr has operated l;:_rfllree minutes, the exhaust air or exhaust pipe should bc warm. Gas Dryers Close the loading door, start the dryer in a heat _tting (rct;cr to the Operating Instructions supplied with the dryer); the dryer will start, the igniter will glow red and the main burner will ignite. IMPORTANT : If all air is not purged out of the gas line, the ga_sigmiter may go off before gas it is ignited. If this happens, aher approximately two minutes the igniter will ag_n attempt ga_ ignition. Step 7: Check Installation 9
-
 1
1 -
2
-
3
-
 4
4 -
 5
5 -
 6
6 -
 7
7 -
 8
8 -
 9
9 -
 10
10 -
 11
11 -
 12
12 -
 13
13 -
 14
14 -
15
-
16
-
17
-
18
-
19
-
20
-
21
-
22
-
23
-
24
-
25
-
26
-
27
-
28
-
29
-
30
-
31
-
32
 |
 |
