LG GS390 Owner's Manual - Page 65
Settings Menu
 |
View all LG GS390 manuals
Add to My Manuals
Save this manual to your list of manuals |
Page 65 highlights
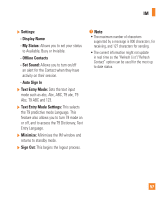
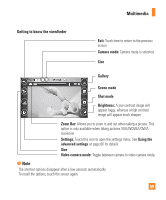
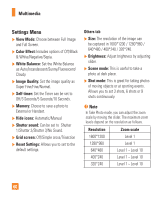
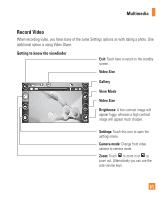
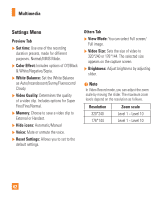
Multimedia Settings Menu ] View Mode: Choose between Full Image and Full Screen. ] Color Effect: Includes options of Off/Black & White/Negative/Sepia. ] White Balance: Set the White Balance as Auto/Incandescent/Sunny/Fluorescent/ Cloudy. ] Image Quality: Set the image quality as Super Fine/Fine/Normal. ] Self-timer: Set the Timer can be set to Off/3 Seconds/5 Seconds/10 Seconds. ] Memory: Choose to save a photo to External or Handset. ] Hide icons: Automatic/Manual ] Shutter sound: Can be set to Shutter 1/Shutter 2/Shutter 3/No Sound. ] Grid screen: Off/Simple cross/Trisection ] Reset Settings: Allows you to set to the default settings. Others tab ] Size: The resolution of the image can be captured in 1600*1200 / 1280*960 / 640*480 / 400*240 / 320*240. ] Brightness: Adjust brightness by adjusting slider. ] Scene mode: This is useful to take a photo at dark place. ] Shot mode: This is great for taking photos of moving objects or at sporting events. Allows you to set 3 shots, 6 shots or 9 shots continuously. n Note In Take Photo mode, you can adjust the zoom scale by moving the slider. The maximum zoom levels depend on the resolution as follows. Resolution Zoom scale 1600*1200 Level 1 1280*960 Level 1 640*480 Level 1 ~ Level 10 400*240 Level 1 ~ Level 10 320*240 Level 1 ~ Level 10 60
-
 1
1 -
2
-
3
-
4
-
5
-
6
-
7
-
8
-
9
-
10
-
11
-
12
-
13
-
14
-
15
-
16
-
17
-
18
-
19
-
20
-
21
-
22
-
23
-
24
-
25
-
26
-
27
-
28
-
29
-
30
-
31
-
32
-
33
-
34
-
35
-
36
-
37
-
38
-
39
-
40
-
41
-
42
-
43
-
44
-
45
-
46
-
47
-
48
-
49
-
50
-
51
-
52
-
53
-
54
-
55
-
56
-
57
-
58
-
59
-
 60
60 -
 61
61 -
 62
62 -
 63
63 -
 64
64 -
 65
65 -
 66
66 -
 67
67 -
 68
68 -
 69
69 -
 70
70 -
71
-
72
-
73
-
74
-
75
-
76
-
77
-
78
-
79
-
80
-
81
-
82
-
83
-
84
-
85
-
86
-
87
-
88
-
89
-
90
-
91
-
92
-
93
-
94
-
95
-
96
-
97
-
98
-
99
-
100
-
101
-
102
-
103
-
104
-
105
-
106
-
107
-
108
-
109
-
110
-
111
-
112
-
113
-
114
-
115
-
116
-
117
-
118
-
119
-
120
-
121
-
122
-
123
-
124
-
125
-
126
-
127
-
128
-
129
 |
 |
