LG LGVX7100 Owner's Manual - Page 38
Picture Message
 |
View all LG LGVX7100 manuals
Add to My Manuals
Save this manual to your list of manuals |
Page 38 highlights
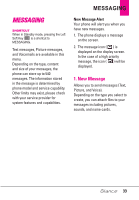
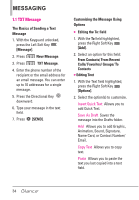
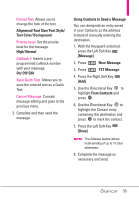
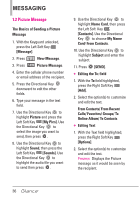
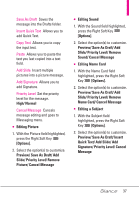
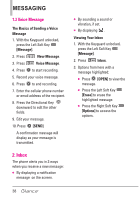
MESSAGING 1.2 Picture Message The Basics of Sending a Picture Message 1. With the Keyguard unlocked, press the Left Soft Key [Message]. 2. Press New Message. 3. Press Picture Message. 4. Enter the cellular phone number or email address of the recipient. 5. Press the Directional Key downward to edit the other fields. 6. Type your message in the text field. 7. Use the Directional Key to highlight Picture and press the Left Soft Key [My Pics]. Use the Directional Key to select the image you want to send, then press . 8. Use the Directional Key to highlight Sound, then press the Left Soft Key [Sounds]. Use the Directional Key to highlight the audio file you want to send then press . 9. Use the Directional Key to highlight Name Card, then press the Left Soft Key [Contacts]. Use the Directional Key to choose My Name Card/ From Contacts. 10. Use the Directional Key to highlight Subject and enter the subject. 11. Press [SEND]. G Editing the To: field 1. With the To field highlighted, press the Right Soft Key [Add]. 2. Select the option(s) to customize and edit the text. From Contacts/ From Recent Calls/ Favorites/ Groups/ To Online Album/ To Contacts G Editing Text 1. With the Text field highlighted, press the Right Soft Key [Options]. 2. Select the option(s) to customize and edit the text. Preview Displays the Picture message as it would be seen by the recipient. 36
-
 1
1 -
2
-
3
-
4
-
5
-
6
-
7
-
8
-
9
-
10
-
11
-
12
-
13
-
14
-
15
-
16
-
17
-
18
-
19
-
20
-
21
-
22
-
23
-
24
-
25
-
26
-
27
-
28
-
29
-
30
-
31
-
32
-
 33
33 -
 34
34 -
 35
35 -
 36
36 -
 37
37 -
 38
38 -
 39
39 -
 40
40 -
 41
41 -
 42
42 -
 43
43 -
44
-
45
-
46
-
47
-
48
-
49
-
50
-
51
-
52
-
53
-
54
-
55
-
56
-
57
-
58
-
59
-
60
-
61
-
62
-
63
-
64
-
65
-
66
-
67
-
68
-
69
-
70
-
71
-
72
-
73
-
74
-
75
-
76
-
77
-
78
-
79
-
80
-
81
-
82
-
83
-
84
-
85
-
86
-
87
-
88
-
89
-
90
-
91
-
92
-
93
-
94
-
95
-
96
-
97
-
98
-
99
-
100
-
101
-
102
-
103
-
104
-
105
-
106
-
107
-
108
-
109
-
110
-
111
-
112
-
113
-
114
-
115
-
116
-
117
-
118
-
119
-
120
-
121
-
122
-
123
-
124
-
125
-
126
-
127
 |
 |
