LG RC700N Owners Manual - Page 22
Set-Top Box Control, Set-Top Box Edit
 |
UPC - 719192171633
View all LG RC700N manuals
Add to My Manuals
Save this manual to your list of manuals |
Page 22 highlights
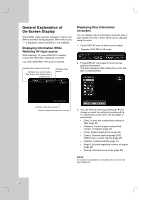
Set-Top Box Control Select [ON] when you connect a Set-Top Box (Cable Box, Satellite Box, Digital Video Recorder, etc) with IR control cable. If not, select [OFF]. Set-Top Box Edit This setting is available only if the [Set-Top Box Control] option is set to [ON]. If you connect the Recorder to the Set-Top Box as described in page 16 so the Recorder can change the channels on the connected Set-Top Box when timer recording of AV1 input starts. 1. Select [Set-Top Box Edit] on the setup menu then press B. The [Edit] icon is highlighted. 2. Press ENTER while the [Edit] icon is highlighted. [Set-Top Box Control] menu shows the current settings. Test Procedure 1) Check the IR control cable connection then press ENTER. (Refer to page 16.) 2) Turn on the Set-Top Box then press ENTER. 3) Use b / B a Remote Control Code of the device then press ENTER. The list of codes displayed onscreen are based on the device type and brand you selected. Each brand of the device can have multiple sets of codes. One code will be tested at a time; if the code does not work, select another code to test. 4) Use v / V / b / B and ENTER to select a channel. 3. If you want to edit the settings, use b / B to select [Edit] icon then press ENTER. The [Set-Top Box Edit] menu appears. 5) Confirm that your Set-Top Box's channel is changed to the selected channel in step 4. 4. Use v / V to select a main option then press ENTER. [Device Type] Selects the device type. [Brand] Selects the brand of the Set-Top Box. [Number of Digits] Selects the number of digits of the Set-Top Box's channel. [Enter Key] If your device needs ENTER key to change channels, select [ON]. If not, select [OFF]. [Key Speed] Select a Key Speed that the recorder sends commands to the connected Set-Top Box. 5. Use v / V to select a sub option then press ENTER. 6. Use v / V to select [Test] option then press ENTER to verify the connections/settings between the Set-Top Box and the Recorder. The recorder is tuned to AV1 automatically. See right for details. If changed, select [Yes] then press ENTER. If not changed, select [No] then press ENTER and repeat from step 3. • Some Set-Top boxes may not be controlled if the device needs sub channel input - the same as 19-1. 6) The Test procedure is complete, press ENTER to exit the menu. If you fail to test • Make sure IR Control Cable connection. (page 16) • Set the [Set-Top Box Edit] options again then proceed to the [Test] option. • If IR control is not activated even though you set again, the Recorder may not control your Set-Top Box according to the device's maker or status. Confirm recommended Set-Top Box on page 16 or contact your Set-Top Box provider. 22
-
 1
1 -
2
-
3
-
4
-
5
-
6
-
7
-
8
-
9
-
10
-
11
-
12
-
13
-
14
-
15
-
16
-
 17
17 -
 18
18 -
 19
19 -
 20
20 -
 21
21 -
 22
22 -
 23
23 -
 24
24 -
 25
25 -
 26
26 -
 27
27 -
28
-
29
-
30
-
31
-
32
-
33
-
34
-
35
-
36
-
37
-
38
-
39
-
40
-
41
-
42
-
43
-
44
-
45
-
46
-
47
-
48
-
49
-
50
-
51
-
52
-
53
-
54
-
55
 |
 |
