LG RC700N Owners Manual - Page 51
Reference
 |
UPC - 719192171633
View all LG RC700N manuals
Add to My Manuals
Save this manual to your list of manuals |
Page 51 highlights
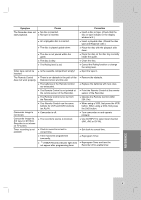
Symptom The Recorder does not start playback. Cause No disc is inserted. No tape is inserted. An unplayable disc is inserted. The disc is placed upside down. The disc is not placed within the guide. The disc is dirty. The Rating level is set. Video tape cannot be inserted. The Remote Control does not work properly. Camcorder image is not shown. Camcorder image via A/V input or DV IN to Recorder is not shown on TV screen. Timer recording is not possible. Is the cassette compartment empty? There is an obstacle in the path of the Remote Control and this unit. The batteries in the Remote Control are exhausted. The Remote Control is not pointed at the remote sensor of the Recorder. The Remote Control is too far from the Recorder. This Remote Control use the same buttons for VCR and DVD functions (ex.PLAY). Camcorder is off. The recorder's source is incorrect. Clock in record is not set to correct time. Timer has been programmed incorrectly. (TIMER Record) indicator light does not appear after programming timer. Correction Insert a disc or tape. (Check that the disc or tape indicator in the display window is lit.) Insert a playable disc. (Check the disc type and Regional code.) Place the disc with the playback side down. Place the disc on the disc tray correctly inside the guide. Clean the disc. Cancel the Rating function or change the rating level. Eject the tape in. Remove the obstacle. Replace the batteries with new ones. Point the Remote Control at the remote sensor of the Recorder. Operate the Remote Control within 23ft (7m). When using a VCR, first press the VCR button. When using a DVD, first press the DVD button. Turn camcorder on and operate properly. Use AV/INPUT to select input channel (AV1, AV2 or DV IN). Set clock to correct time. Reprogram Timer. Reprogram Timer and turn the Recorder off to enable timer. REFERENCE 51
-
 1
1 -
2
-
3
-
4
-
5
-
6
-
7
-
8
-
9
-
10
-
11
-
12
-
13
-
14
-
15
-
16
-
17
-
18
-
19
-
20
-
21
-
22
-
23
-
24
-
25
-
26
-
27
-
28
-
29
-
30
-
31
-
32
-
33
-
34
-
35
-
36
-
37
-
38
-
39
-
40
-
41
-
42
-
43
-
44
-
45
-
 46
46 -
 47
47 -
 48
48 -
 49
49 -
 50
50 -
 51
51 -
 52
52 -
 53
53 -
 54
54 -
 55
55
 |
 |
