LG RU-60PZ61 Owners Manual - Page 39
Command2:l, G To select OSD On Screen Display on/off.
 |
View all LG RU-60PZ61 manuals
Add to My Manuals
Save this manual to your list of manuals |
Page 39 highlights
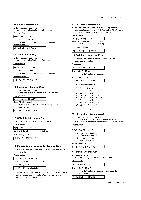
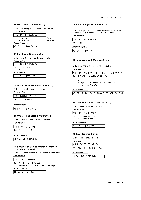
External Control Device Setup 09. Color (Command2:i) G To adjust the screen color. You can also adjust color in the Picture menu. Transmission [[k][i][ ][Set ID][ ][Data][Cr] I Data Min:0~Max:64 • Refer to 'Real data mapping 1'. See page 38. Acknowledgement [[i][ ][Set ID][ ][OK][Data][x] I 10. Tint (Command2:j) G To adjust the screen tint. You can also adjust tint in the Picture menu. Transmission [[k][j ][ ][Set ID][ ][Data][Cr] I Data Red : 0~ Green : 64 • Refer to 'Real data mapping 1'. See page 38. Acknowledgement [[j ][ ][Set ID][ ][OK][Data][x] I 11. Sharpness (Command2:k) G To adjust the screen sharpness. You can also adjust sharpness in the Picture menu. Transmission [[k][k][ ][Set ID][ ][Data][Cr] ] Data Min: 0 ~ Max: 64 • Refer to 'Real data mapping 1'. See page 38. Acknowledgement [[k][ ][Set ID][ ][OK][Data][x] ] 12. OSD Select (Command2:l) G To select OSD (On Screen Display) on/off. Transmission [[k][I][ ][Set ID][ ][Data][Cr] Data 0: OSD off I 1: OSD on Acknowledgement I[I][ ][Set ID][ ][OK][Data][x] 13. Remote Control Lock Mode (Command2:m) G To lock the remote control and the front panel controls on the monitor. Transmission I[k][m][ ][Set ID][ ][Data][Cr] Data 0: Lock off Acknowledgement ] 1: Lock on [[m][ ][Set ID][ ][OK][Data][x] J • If you're not using the remote control and front panel controls on the monitor, use this mode. When main power is on/off, remote control lock is released. 14. PIP / DW (Command2:n) G To control the PIP (Picture In picture)/DW (Double Window). You can also control the PIP/DW using the PIP/DW button on the remote control or in the PIP/DW menu. Transmission [[k][n][ ][Set ID][ ][Data][Cr] Data 0: PIP/DW off 1: PIP Acknowledgement I 2:DW1 3:DW2 [[n][ ][Set IU][ ][OK][Data][x] I 15. Split Zoom (Command2:p) G To operate split zoom function and select the split zoom section number. Transmission [[k][p][ ][Set ID][ ][Data][Cr] ] Data Min: 0 ~ Max:99 • Refer to 'Real data mapping 2'. Acknowledgement [[p][ ][Set ID][ ][OK][Data][x] ] * Real data mapping 2 0 : Reset split zoom 21 : Selection 1 of 2 split zoom 24: Selection 4 of 2 split zoom 41: Selection 1 of 4 split zoom 42: Selection 2 of 4 split zoom 44: Selection 4 of 4 split zoom 45: Selection 5 of 4 split zoom 91 : Selection 1 of 9 split zoom 99: Selection 9 of 9 split zoom 16. PIP Position (Command2:q) G To select sub picture position for PIP. You can also adjust the sub picture position using WIN.POSITION on the remote control or in the PIP/DW menu. Transmission I[k][q][ ][Set ID][ ][Data][Cr] ] Data 0: Right down on screen 1: Left down on screen 2: Left up on screen 3: Right up on screen Acknowledgement [[q][ ][Set ID][ ][OK][Data][x] ] 17. Treble (Command2:r) G To adjust treble. You can also adjust treble in the Sound menu. Transmission [[k][r][ ][Set ID][ ][Data][Cr] ] Data Min: 0 ~ Max: 64 • Refer to 'Real data mapping 1'. See page 38. Acknowledgement [[r][ ][Set ID][ ][OK][Data][x] ] Owner's Manual 39
-
 1
1 -
2
-
3
-
4
-
5
-
6
-
7
-
8
-
9
-
10
-
11
-
12
-
13
-
14
-
15
-
16
-
17
-
18
-
19
-
20
-
21
-
22
-
23
-
24
-
25
-
26
-
27
-
28
-
29
-
30
-
31
-
32
-
33
-
 34
34 -
 35
35 -
 36
36 -
 37
37 -
 38
38 -
 39
39 -
 40
40 -
 41
41 -
 42
42 -
 43
43 -
 44
44 -
45
-
46
-
47
-
48
-
49
-
50
-
51
-
52
 |
 |
