Lenovo Ambra Achiever 7000 Mwave Multimedia Modem Plus User's Guide model 715 - Page 10
Configuring Your Multimedia Modem Plus For Windows
 |
View all Lenovo Ambra Achiever 7000 manuals
Add to My Manuals
Save this manual to your list of manuals |
Page 10 highlights
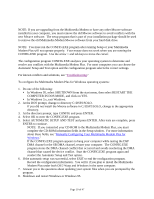
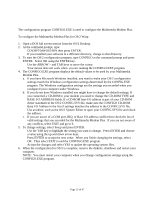
CONFIGURING YOUR MULTIMEDIA MODEM PLUS FOR WINDOWS NOTE: If you are upgrading from the Multimedia Modem or have any other Mwave software installed in your computer, you must remove the old Mwave software to avoid conflicts with the new Mwave software. The setup program that is part of your installation package should be used to remove the old Multimedia Modem Mwave software from your hard disk drive. NOTE: You must run the CONFIG.EXE program after running Setup or your Multimedia Modem Plus will not operate properly. Your mouse does not work when you are running the CONFIG.EXE program. Use the arrow > and tab keys to move the cursor. The configuration program CONFIG.EXE analyzes your operating system to determine and resolve any conflicts with the Multimedia Modem Plus. For most computers you can choose the Automatic Setup and Test option and the configuration program selects the correct settings. For known conflicts and solutions, see "Troubleshooting." To configure the Multimedia Modem Plus for Windows operating systems: 1. Do one of the following: ! In Windows 95, select SHUTDOWN from the start menu, then select RESTART THE COMPUTER IN DOS MODE, and click on YES. ! In Windows 3.x, exit Windows. 2. At the DOS prompt, change to directory C:\DSP2\SOLO. If you did not install the Mwave software in C:\DSP2\SOLO, change to the appropriate directory. 3. At the directory prompt, type CONFIG and press ENTER. 4. Select OK to enter the CONFIG.EXE program. 5. Select AUTOMATIC SETUP AND TEST and press ENTER. After tests are complete, press ENTER to continue. NOTE: If you connected your CD-ROM to the Multimedia Modem Plus, you must complete the CD-ROM information fields in the Setup window. For more information about these fields, see "Manually Configuring Your Multimedia Modem Plus for Windows." If the CONFIG.EXE program appears to hang your computer while testing the DSP DMA channel or the SB DMA channel, restart your computer. The CONFIG.EXE program stores the DMA channel conflict that occurred and avoids reselecting the DMA channel that caused the device conflict. Start the CONFIG.EXE program again and reselect the Automatic Setup and Test option. 6. If the automatic setup was successful, select EXIT to end the configuration program. Record the configuration information. You will it if you plan to install the Multimedia Modem Plus under both OS/2 Warp and Windows in the same computer. 7. Answer yes to the questions about updating your system files when you are prompted by the program. 8. Shutdown and restart Windows or Windows 95. Page 10 of 47
-
 1
1 -
2
-
3
-
4
-
 5
5 -
 6
6 -
 7
7 -
 8
8 -
 9
9 -
 10
10 -
 11
11 -
 12
12 -
 13
13 -
 14
14 -
 15
15 -
16
-
17
-
18
-
19
-
20
-
21
-
22
-
23
-
24
-
25
-
26
-
27
-
28
-
29
-
30
-
31
-
32
-
33
-
34
-
35
-
36
-
37
-
38
-
39
-
40
-
41
-
42
-
43
-
44
-
45
-
46
-
47
 |
 |