Lenovo Ambra Achiever 7000 Mwave Multimedia Modem Plus User's Guide model 715 - Page 12
Configuring Mwave Dos, What To Do Next
 |
View all Lenovo Ambra Achiever 7000 manuals
Add to My Manuals
Save this manual to your list of manuals |
Page 12 highlights
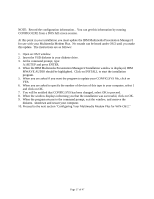
6. When the configuration is complete and all test have successfully completed: Record the configuration information. You will need it if you plan to install Multimedia Modem Plus under OS/2 Warp and Windows in the same computer. a. Select EXIT, and press ENTER to end the configuration program and save your configured settings. b. Answer yes to the questions about updating your system files when you are prompted by the program. c. Shutdown and restart Windows or Windows 95. CONFIGURING MWAVE DOS If you want to change your Multimedia Modem Plus settings to use advanced audio, telegaming, or another supported application, you must access the Mwave DOS configuration window. This window is displayed when you you start DOS or close Windows with the Multimedia Modem Plus installed. To access this window and change the DOS parameters for your session: 1. Exit Windows and start your computer in DOS. 2. From any directory, type FASTCFG and press Enter. 3. When the Fastcfg-Current Mwave DOS Settings window is displayed, select the appropriate application type for your session. Use the ARROW > and TAB keys to move the cursor. 4. Select OK to save the setting and return to DOS. NOTE: For further information on FASTCFG, see "Using DOS Applications." 5. Start your application. For information about how to run an application, see the documentation that comes with the application. You have completed the software installation process for Windows and are ready to use the Multimedia Modem Plus. WHAT TO DO NEXT ! If you want to install the Multimedia Modem Plus software under OS/2 Warp continue with the next section. ! For information about using the Multimedia Modem Plus, see "Using Voice, Fax and Data." ! If you are installing QuickLink Message Center or software applications that are not part of this package, read "Installing Applications Software." Page 12 of 47
-
 1
1 -
2
-
3
-
4
-
5
-
6
-
 7
7 -
 8
8 -
 9
9 -
 10
10 -
 11
11 -
 12
12 -
 13
13 -
 14
14 -
 15
15 -
 16
16 -
 17
17 -
18
-
19
-
20
-
21
-
22
-
23
-
24
-
25
-
26
-
27
-
28
-
29
-
30
-
31
-
32
-
33
-
34
-
35
-
36
-
37
-
38
-
39
-
40
-
41
-
42
-
43
-
44
-
45
-
46
-
47
 |
 |
