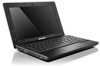
Lenovo IdeaPad S100 Lenovo IdeaPad S100 Hardware Maintainence Manual
Lenovo IdeaPad S100 Manual
 |
View all Lenovo IdeaPad S100 manuals
Add to My Manuals
Save this manual to your list of manuals |
Lenovo IdeaPad S100 manual content summary:
- Lenovo IdeaPad S100 | Lenovo IdeaPad S100 Hardware Maintainence Manual - Page 1
IdeaPad S100 Hardware Maintenance Manual - Lenovo IdeaPad S100 | Lenovo IdeaPad S100 Hardware Maintainence Manual - Page 2
using this information and the product it supports, be sure to read the general information under "Notices" on page 61. First Edition (March 2011) © Copyright Lenovo 2011. All rights reserved. LENOVO products, data, computer software, and services have been developed exclusively at private expense - Lenovo IdeaPad S100 | Lenovo IdeaPad S100 Hardware Maintainence Manual - Page 3
password 22 Power management 22 Screen blank mode 22 Sleep (standby) mode 22 Hibernation mode 23 Lenovo IdeaPad S100 24 Specifications 24 Status indicators 26 Fn key combinations 28 FRU replacement notices 29 Screw notices 29 Removing and replacing an FRU 30 Base screws 30 Battery - Lenovo IdeaPad S100 | Lenovo IdeaPad S100 Hardware Maintainence Manual - Page 4
product-specific section includes service, reference, and product-specific parts information. Important: This manual is intended only for trained servicers who are familiar with Lenovo IdeaPad products. Use this manual to troubleshoot problems effectively. Before servicing a Lenovo IdeaPad product - Lenovo IdeaPad S100 | Lenovo IdeaPad S100 Hardware Maintainence Manual - Page 5
Lenovo IdeaPad S100 Hardware Maintenance Manual Safety information This chapter presents the following safety information that you need to get familiar with before you service an IdeaPad S100 computer: • "General safety" on page 1 • "Electrical safety" on page 2 • "Safety inspection guide" on page 3 - Lenovo IdeaPad S100 | Lenovo IdeaPad S100 Hardware Maintainence Manual - Page 6
Lenovo IdeaPad S100 Hardware Maintenance Manual power-off (EPO) switch, disconnecting the switch or electrical outlet. If an electrical accident occurs, you can then operate the switch or unplug the power when you work with very high voltages; instructions for these precautions are in the safety - Lenovo IdeaPad S100 | Lenovo IdeaPad S100 Hardware Maintainence Manual - Page 7
Lenovo IdeaPad S100 Hardware Maintenance Manual • Do not touch live electrical circuits with the reflective surface of a plastic dental mirror. The surface is conductive; such touching can cause personal injury and machine damage. • Do not service the following parts with the power on when they are - Lenovo IdeaPad S100 | Lenovo IdeaPad S100 Hardware Maintainence Manual - Page 8
Lenovo IdeaPad S100 Hardware Maintenance Manual your skin to eliminate static on your body. • Prevent the part from touching your clothing. Most clothing is insulative and retains a listed below, to provide protection that meets the specific service requirement. Note: The use of a grounding system - Lenovo IdeaPad S100 | Lenovo IdeaPad S100 Hardware Maintainence Manual - Page 9
Lenovo IdeaPad S100 Hardware Maintenance Manual Safety notices: multilingual translations The safety notices in this section are provided in English, French, German, Hebrew, Italian, Japanese, and Spanish. Safety notice 1 Before the computer is powered on after FRU replacement, make sure all screws, - Lenovo IdeaPad S100 | Lenovo IdeaPad S100 Hardware Maintainence Manual - Page 10
Lenovo IdeaPad S100 Hardware Maintenance Manual Safety notice 2 DANGER Some standby batteries contain a small amount of nickel and cadmium. Do not disassemble a standby battery, recharge it, throw it into fire or water, or shortcircuit it. Dispose of the battery as required by local ordinances or - Lenovo IdeaPad S100 | Lenovo IdeaPad S100 Hardware Maintainence Manual - Page 11
Lenovo IdeaPad S100 Hardware Maintenance Manual Safety notice 3 DANGER The battery pack contains small amounts of nickel. Do not disassemble it, throw it into fire or water, or short-circuit it. Dispose of the battery pack as required by local ordinances or regulations. Use only the battery in the - Lenovo IdeaPad S100 | Lenovo IdeaPad S100 Hardware Maintainence Manual - Page 12
Lenovo IdeaPad S100 Hardware Maintenance Manual Safety notice 4 DANGER The lithium battery can cause a fire, an explosion, or a severe burn. Do not recharge it, remove its polarized connector, disassemble it, heat it above 100°C (212°F), incinerate it, or expose its cell contents to water. Dispose - Lenovo IdeaPad S100 | Lenovo IdeaPad S100 Hardware Maintainence Manual - Page 13
Lenovo IdeaPad S100 Hardware Maintenance Manual Safety notice 5 If the LCD breaks and the fluid from inside the LCD gets into your eyes or per almeno 15 minuti; poi consultare un medico se i sintomi dovessero permanere. Si la LCD se rompe y el fluido de su interior entra en contacto con sus ojos o - Lenovo IdeaPad S100 | Lenovo IdeaPad S100 Hardware Maintainence Manual - Page 14
Lenovo IdeaPad S100 Hardware Maintenance Manual Safety notice 6 DANGER To avoid shock, do not remove the plastic cover that protects the lower part of the inverter entzünden oder Verletzungen bei Personen hervorzurufen. Sebbene le batterie di alimentazione siano a basso voltaggio, una batteria in - Lenovo IdeaPad S100 | Lenovo IdeaPad S100 Hardware Maintainence Manual - Page 15
Lenovo IdeaPad S100 Hardware Maintenance Manual Safety notice 8 DANGER Before removing any FRU, turn off the computer, unplug all power cords from electrical outlets, remove the battery to the requirements of the Department of Health and Human Services 21 Code of Federal Regulations (DHHS 21 CFR) - Lenovo IdeaPad S100 | Lenovo IdeaPad S100 Hardware Maintainence Manual - Page 16
Lenovo IdeaPad S100 Hardware Maintenance Manual l'esecuzione di procedure diverse da quelle specificate possono provocare l'esposizione a. El uso device could result in exposure to hazardous laser radiation. There are no serviceable parts inside those drives. Do not open. A CD-ROM drive, a DVD - Lenovo IdeaPad S100 | Lenovo IdeaPad S100 Hardware Maintainence Manual - Page 17
Lenovo IdeaPad S100 Hardware Maintenance Manual DANGER Emits visible and invisible laser radiation when open. Do not stare into the beam, do not view directly with optical instruments, and avoid direct - Lenovo IdeaPad S100 | Lenovo IdeaPad S100 Hardware Maintainence Manual - Page 18
posted on the customer support site: http://consumersupport.lenovo.com/. Strategy for replacing FRUs Before replacing parts: Make sure that all software fixes, drivers, and BIOS downloads are installed before replacing any FRUs listed in this manual. After a system board is replaced, ensure that the - Lenovo IdeaPad S100 | Lenovo IdeaPad S100 Hardware Maintainence Manual - Page 19
Lenovo IdeaPad S100 Hardware Maintenance Manual Strategy for replacing a hard disk drive Always try to run a low-level format before replacing a hard disk drive. This will cause all customer data on the hard disk to be lost. Make sure that the customer has a current backup of - Lenovo IdeaPad S100 | Lenovo IdeaPad S100 Hardware Maintainence Manual - Page 20
Lenovo IdeaPad S100 Hardware Maintenance Manual Products marketed before June 2006 Products marketed after June 2006 Current or original part Replacement FRU Current or original part Replacement FRU Non-RoHS Can be Non-RoHS Non-RoHS Non-RoHS Can be RoHS Can sub to RoHS Must be RoHS Must be - Lenovo IdeaPad S100 | Lenovo IdeaPad S100 Hardware Maintainence Manual - Page 21
Lenovo IdeaPad S100 Hardware Maintenance Manual General checkout This chapter presents the following information: • "What to do first" on page 17 • "Power system checkout" on page 18 Before you go to the checkout, make sure to read the following important notes: Notes: • Only certified trained - Lenovo IdeaPad S100 | Lenovo IdeaPad S100 Hardware Maintainence Manual - Page 22
computer password (making the computer unusable) • Sticky keys caused by spilling a liquid onto the keyboard • Use of an incorrect AC adapter on laptop products The following symptoms might indicate damage caused by nonwarranted activities: • Missing parts might be a symptom of unauthorized service - Lenovo IdeaPad S100 | Lenovo IdeaPad S100 Hardware Maintainence Manual - Page 23
differ from the one you are servicing. 3. If the voltage is not correct, replace the AC adapter. 4. If the voltage is acceptable, do the following: • Replace the system board. • If the problem continues, go to "Lenovo IdeaPad S100" on page 24. Note: Noise from the AC adapter does not always indicate - Lenovo IdeaPad S100 | Lenovo IdeaPad S100 Hardware Maintainence Manual - Page 24
Lenovo IdeaPad S100 Hardware Maintenance Manual percentage of battery power remaining is displayed. To get detailed information about the battery, double-click the Power Meter icon. Note: If the battery pack becomes hot, it may not be able to be charged. Remove it from the computer and leave it at - Lenovo IdeaPad S100 | Lenovo IdeaPad S100 Hardware Maintainence Manual - Page 25
Lenovo IdeaPad S100 Hardware Maintenance Manual Related service information This chapter presents the following information: • "Restoring the factory contents by using OneKey Recovery" on page 21 • "Passwords" on page 22 • "Power management" on page 22 Restoring the factory contents by using OneKey - Lenovo IdeaPad S100 | Lenovo IdeaPad S100 Hardware Maintainence Manual - Page 26
the servicer, there is no service procedure to reset the password. The system board must be replaced for a scheduled fee. Power management Note: Power management modes are not supported for APM operating system. To reduce power consumption, the computer has three power management modes: screen blank - Lenovo IdeaPad S100 | Lenovo IdeaPad S100 Hardware Maintainence Manual - Page 27
IdeaPad S100 Hardware Maintenance Manual • If a "suspend time" has been set on the timer, and the user does not do any operation with the keyboard, the hard disk, the parallel connector, or the diskette drive within that time. • If the battery indicator is amber, indicating that the battery power - Lenovo IdeaPad S100 | Lenovo IdeaPad S100 Hardware Maintainence Manual - Page 28
Lenovo IdeaPad S100 Hardware Maintenance Manual Lenovo IdeaPad S100 This chapter presents the following product-specific service references and product-specific parts information: • "Specifications" on page 24 • "Status indicators" on page 26 • "Fn key combinations" on page 28 • "FRU replacement - Lenovo IdeaPad S100 | Lenovo IdeaPad S100 Hardware Maintainence Manual - Page 29
Lenovo IdeaPad S100 Hardware Maintenance Manual Table 1.Specifications (Continued) Feature I/O port Audio Video Ethernet (on the system board) WiMax/WLAN Card WLAN/ Bluetooth Combo card Keyboard Integrated camera Battery AC adapter Pre-installed operating system Description • Audio combo jack • - Lenovo IdeaPad S100 | Lenovo IdeaPad S100 Hardware Maintainence Manual - Page 30
Lenovo IdeaPad S100 Hardware Maintenance Manual Status indicators The system status indicators below show the computer status: Table 2.Status indicators No. Symbol Indicator Indicator status Meaning Power On (solid white) The computer is powered on. Blinking Blinking The computer is in sleep - Lenovo IdeaPad S100 | Lenovo IdeaPad S100 Hardware Maintainence Manual - Page 31
Lenovo IdeaPad S100 Hardware Maintenance Manual Table 2.Status indicators (Continued) No. Symbol Indicator Indicator status Meaning Battery On (solid white) The battery has more than 20% charge. Solid amber The battery has between 5% and 20% charge. Fast blinking amber The battery has less - Lenovo IdeaPad S100 | Lenovo IdeaPad S100 Hardware Maintainence Manual - Page 32
camera. Enter sleep mode. Turn on/off the backlight of the LCD screen. Open the interface for the display device switch to select this notebook or an external display. Open the interface for integrated wireless devices settings (On/Off). Enable/Disable the touchpad. Start/Pause playback of Windows - Lenovo IdeaPad S100 | Lenovo IdeaPad S100 Hardware Maintainence Manual - Page 33
IdeaPad S100 Hardware Maintenance Manual FRU replacement notices This section presents notices related to removing and replacing parts. Read this section carefully before replacing any FRU. Screw notices Loose screws can cause a reliability problem. In the Lenovo IdeaPad computer, this problem - Lenovo IdeaPad S100 | Lenovo IdeaPad S100 Hardware Maintainence Manual - Page 34
Lenovo IdeaPad S100 Hardware Maintenance Manual Removing and replacing an FRU This section presents exploded figures with the instructions to indicate how to remove and replace the FRU. Make sure to observe the following general rules: 1. Do not attempt to service any computer unless you have been - Lenovo IdeaPad S100 | Lenovo IdeaPad S100 Hardware Maintainence Manual - Page 35
Lenovo IdeaPad S100 Hardware Maintenance Manual Figure 1: Removal steps of Base screws Step Screw (quantity) Color Torque 2 M2.0 × 6.0 mm, flat round-head, Black nylon-coated (6) 1.85 kgfcm Loosen six back screws - Lenovo IdeaPad S100 | Lenovo IdeaPad S100 Hardware Maintainence Manual - Page 36
Lenovo IdeaPad S100 Hardware Maintenance Manual Battery pack Figure 2: Removal steps of Battery pack 4 Step Screw (quantity) Color Torque 2 M2.0 × 1.7 mm, flat-head, nylon-coated (3) Black 1.0 kgfcm Unlock the battery release lever (left and right) need to indicate in the figure . Holding - Lenovo IdeaPad S100 | Lenovo IdeaPad S100 Hardware Maintainence Manual - Page 37
Lenovo IdeaPad S100 Hardware Maintenance Manual Keyboard For access, remove this FRU: • "Base screws" on page 30 • "Battery pack" on page 32 Figure 3: Removal steps of keyboard 1 3 Step Screw (quantity) Color Torque 2 M2.0 × 6.0 mm, flat round-head, Black nylon-coated (8) 1.85 kgfcm Lift and - Lenovo IdeaPad S100 | Lenovo IdeaPad S100 Hardware Maintainence Manual - Page 38
Lenovo IdeaPad S100 Hardware Maintenance Manual Base cover For access, remove this FRU: • "Base screws" on page 30 • "Battery pack" on page 32 • "Keyboard" on page 33 Figure 4: Removal steps of back cover 1 Lift the base cover shown by arrow . DANGER Before removing any FRU, turn off the computer, - Lenovo IdeaPad S100 | Lenovo IdeaPad S100 Hardware Maintainence Manual - Page 39
Lenovo IdeaPad S100 Hardware Maintenance Manual Note: Applying labels to the base cover The new base cover FRU is shipped with a kit containing labels of several kinds. When you replace the base cover, you need to apply the following label: The following labels need to be peeled off from the old - Lenovo IdeaPad S100 | Lenovo IdeaPad S100 Hardware Maintainence Manual - Page 40
Lenovo IdeaPad S100 Hardware Maintenance Manual DIMM For access, remove this FRU: • "Base screws" on page 30 • "Battery pack" on page 32 • "Keyboard" on page by arrow . Note: If only one DIMM is used on the computer you are servicing, the card must be installed in SLOT-0 ( : lower slot), but not in - Lenovo IdeaPad S100 | Lenovo IdeaPad S100 Hardware Maintainence Manual - Page 41
Lenovo IdeaPad S100 Hardware Maintenance Manual Hard disk drive For access, remove this FRU: • "Base screws" on page 30 • "Battery pack" on page 32 • "Keyboard" on page 33 • "Base cover" on page 34 Attention: • Do not drop the hard disk drive or apply any physical shock to it. The hard - Lenovo IdeaPad S100 | Lenovo IdeaPad S100 Hardware Maintainence Manual - Page 42
Lenovo IdeaPad S100 Hardware Maintenance Manual When installing: Make sure that the HDD connector is attached firmly. Figure 7: Removal steps of hard disk drive (continued) 1 2 1 3 Step Screw (quantity) Color Torque 2 M3.0 × 3.0 - Lenovo IdeaPad S100 | Lenovo IdeaPad S100 Hardware Maintainence Manual - Page 43
Lenovo IdeaPad S100 Hardware Maintenance Manual USB port For access, remove this FRU: • "Base screws" on page 30 • "Battery pack" on page 32 • "Keyboard" on page 33 • "Base cover" on page 34 Figure 8: Removal steps of USB po 1 2 Step Screw (quantity) Color Torque 2 M2.0 × 3.0 mm, flat round- - Lenovo IdeaPad S100 | Lenovo IdeaPad S100 Hardware Maintainence Manual - Page 44
Lenovo IdeaPad S100 Hardware Maintenance Manual Fan assembly and Heat Sink assembly For access, remove this FRU: • "Base screws" on page 30 • "Battery pack" on page 32 • "Keyboard" on page 33 • "Base cover" on page 34 Figure 9: Removal steps of fan assembly and heat sink assembly 1 1 1 1 1 2 - Lenovo IdeaPad S100 | Lenovo IdeaPad S100 Hardware Maintainence Manual - Page 45
Lenovo IdeaPad S100 Hardware Maintenance Manual TVturner For access, remove this FRU: • "Base screws" on page 30 • "Battery pack" on page 32 • "Keyboard" on page 33 • "Base cover" on page 34 Figure 10: Removal steps of TVturner 1 1 2 Step Screw (quantity) Color Torque 2 M2.0 × 3.0 mm, flat - Lenovo IdeaPad S100 | Lenovo IdeaPad S100 Hardware Maintainence Manual - Page 46
Lenovo IdeaPad S100 Hardware Maintenance Manual System board Important notices for handling the system FRU: • "Base screws" on page 30 • "Battery pack" on page 32 • "Keyboard" on page 33 • "Base cover" on page 34 • "Hard disk drive" on page 37 • "USB port" on page 39 • "Fan assembly and Heat Sink - Lenovo IdeaPad S100 | Lenovo IdeaPad S100 Hardware Maintainence Manual - Page 47
Lenovo IdeaPad S100 Hardware Maintenance Manual When installing: Make sure that the connectors are attached firmly. Speakers For access, remove this FRU: • "Base screws" on page 30 • "Battery pack" on page 32 • "Keyboard" on page 33 • "Base cover" on page 34 • "Hard disk drive" on page 37 • "USB - Lenovo IdeaPad S100 | Lenovo IdeaPad S100 Hardware Maintainence Manual - Page 48
Lenovo IdeaPad S100 Hardware Maintenance Manual LCD unit For access, remove this FRU: • "Base screws" on page 30 • "Battery pack" on page 32 • "Keyboard" on page 33 • "Base cover" on page 34 Figure 13: Removal steps of back screws 1 1 Step Screw (quantity) 2 M2.0 × 5.0 mm, flat round-head, nylon - Lenovo IdeaPad S100 | Lenovo IdeaPad S100 Hardware Maintainence Manual - Page 49
Lenovo IdeaPad S100 Hardware Maintenance Manual Figure 14: Removal steps of LCD front bezel 1 2 1 2 2 Step Screw (quantity) Color Torque 2 M2.0 × 3.0 mm, flat round-head, Black nylon-coated (2) 1.35 kgfcm Remove two screws . Remove the LCD front bezel in the direction shown by arrows . - Lenovo IdeaPad S100 | Lenovo IdeaPad S100 Hardware Maintainence Manual - Page 50
Lenovo IdeaPad S100 Hardware Maintenance Manual Figure 15: Removal steps of LCD panel 1 1 2 1 1 Step Screw (quantity) Color Torque 2 M2.0 × 3.0 mm, flat round-head, Black nylon-coated (4) 1.35 kgfcm Remove four screws , and then remove the LCD panel in the direction shown by arrow . 46 - Lenovo IdeaPad S100 | Lenovo IdeaPad S100 Hardware Maintainence Manual - Page 51
Lenovo IdeaPad S100 Hardware Maintenance Manual Integrated camera For access, remove this FRU: • "Base screws" on page 30 • "Battery pack" on page 32 • "Keyboard" on page 33 • "Base cover" on page 34 • "Hard disk drive" on page 37 • "USB port" on page 39 • "Fan assembly and Heat Sink assembly" on - Lenovo IdeaPad S100 | Lenovo IdeaPad S100 Hardware Maintainence Manual - Page 52
Lenovo IdeaPad S100 Hardware Maintenance Manual Locations Top view Attention: • Do NOT open the display panel beyond 130 degrees. When closing the display panel, be careful NOT to leave pens or any other objects in between the display panel and the keyboard. Otherwise, the display panel may be - Lenovo IdeaPad S100 | Lenovo IdeaPad S100 Hardware Maintainence Manual - Page 53
Lenovo IdeaPad S100 Hardware Maintenance Manual Power button System status indicators Touchpad Wireless module antennas Press this button to turn on the computer. - The touchpad functions as a conventional mouse. The built-in antennas ensure optimal reception of wireless radio. Left-side view AC - Lenovo IdeaPad S100 | Lenovo IdeaPad S100 Hardware Maintainence Manual - Page 54
Lenovo IdeaPad S100 Hardware Maintenance Manual Right-side view USB port RJ-45 port Lanyard hole Connects to USB devices. This port connects the computer to an Ethernet network. Used for attaching a lanyard (not supplied). Front view Memory card slot Insert memory cards (not supplied) here. 50 - Lenovo IdeaPad S100 | Lenovo IdeaPad S100 Hardware Maintainence Manual - Page 55
Lenovo IdeaPad S100 Hardware Maintenance Manual Bottom view Battery latch manual The manual battery latch is used to keep the battery pack secured in place. Battery pack - Battery latch spring loaded Speakers The spring-loaded battery latch keeps the battery pack secured in place. The stereo - Lenovo IdeaPad S100 | Lenovo IdeaPad S100 Hardware Maintainence Manual - Page 56
Lenovo IdeaPad S100 Hardware Maintenance Manual Parts list This section presents the following service parts: • "Overall" on page 53 • "LCD FRUs" on page 56 • "Keyboard" on page 57 • "Miscellaneous parts" on page 58 • "AC adapters" on page 59 • "Power cords" on page 59 Note: • Each FRU is - Lenovo IdeaPad S100 | Lenovo IdeaPad S100 Hardware Maintainence Manual - Page 57
Lenovo IdeaPad S100 Hardware Maintenance Manual Overall 53 - Lenovo IdeaPad S100 | Lenovo IdeaPad S100 Hardware Maintainence Manual - Page 58
Lenovo IdeaPad S100 Hardware Maintenance Manual Table 4.Parts list-Overall No. FRU FRU No. a-e See "Miscellaneous parts" on page 58 1 LCD unit (see "LCD FRUs" on page 56) 2 Keyboard bezel assembly with touchpad 1102-00285 3 System board assembly with Intel Atom Pineview N455 3105-00118 - Lenovo IdeaPad S100 | Lenovo IdeaPad S100 Hardware Maintainence Manual - Page 59
Lenovo IdeaPad S100 Hardware Maintenance Manual Table 4.Parts list-Overall (Continued) No. FRU 10 SATA Hard disk drive assembly, 320GB, 5,400rpm 10 SATA Hard disk drive assembly, 320GB, 5,400rpm 10 SATA Hard disk drive assembly, 320GB, 5,400rpm 11 1GB DDR3-1333 SDRAM SO-DIMM card 11 1GB DDR3-1333 - Lenovo IdeaPad S100 | Lenovo IdeaPad S100 Hardware Maintainence Manual - Page 60
Lenovo IdeaPad S100 Hardware Maintenance Manual LCD FRUs Table 5.Parts list-LCD FRUs No. FRU 1 LCD cover 2 LCD panel, 10.1-in., WSVGA, Glare 2 LCD panel, 10.1-in., WSVGA, Glare 3 Left hinge 3 Right hinge 4 LCD front bezel 5 Integrated camera (0.3M) 5 Integrated camera (2.0M) 6 - Lenovo IdeaPad S100 | Lenovo IdeaPad S100 Hardware Maintainence Manual - Page 61
Lenovo IdeaPad S100 Hardware Maintenance Manual Table 5.Parts list-LCD FRUs (Continued) No. FRU 7 Left antenna for Wi-Fi&WiMAX 7 Right antenna for Wi-Fi&WiMAX 8 Power button 9 Power cable FRU No. 1109-00285/6 1109-00276/7 3005-00171 1109-00280/1 Keyboard Table 6.Parts list-Keyboard - Lenovo IdeaPad S100 | Lenovo IdeaPad S100 Hardware Maintainence Manual - Page 62
Lenovo IdeaPad S100 Hardware Maintenance Manual Table 6.Parts list-Keyboard (Continued) Language Nodic Portuguese Russian Slovak Slovenian -010939 25-010968 25-010937 25-010966 Miscellaneous parts Table 7.Parts list-Miscellaneous parts FRU (a) HDD bracket (b) USB cable (c) DC-in cable (d) RJ-45 - Lenovo IdeaPad S100 | Lenovo IdeaPad S100 Hardware Maintainence Manual - Page 63
Lenovo IdeaPad S100 Hardware Maintenance Manual AC adapters Table 8.Parts list-AC adapters FRU 3-pin (30W, 20V) 3-pin (30W, 20V) 3-pin (30W, 20V) FRU No. 36-001806 36-001809 36-001804 Power cords Table 9.Parts list-3-pin power cords Region (3 Pin) Bangladesh, Pakistan, South Africa Argentina - Lenovo IdeaPad S100 | Lenovo IdeaPad S100 Hardware Maintainence Manual - Page 64
Lenovo IdeaPad S100 Hardware Maintenance Manual Table 9.Parts list-3-pin power cords (Continued) Region (3 Pin) U.K., China (Hong Kong S.A.R.) P/N 145-000593 145-000561 145-000605 60 - Lenovo IdeaPad S100 | Lenovo IdeaPad S100 Hardware Maintainence Manual - Page 65
document are not intended for use in implantation or other life support applications where malfunction may result in injury or death to persons. The information contained in this document does not affect or change Lenovo product specifications or warranties. Nothing in this document shall operate as - Lenovo IdeaPad S100 | Lenovo IdeaPad S100 Hardware Maintainence Manual - Page 66
Lenovo IdeaPad S100 Hardware Maintenance Manual Trademarks The following terms are trademarks or registered trademarks of Lenovo in the United States, other countries, or both. Lenovo IdeaPad OneKey Microsoft and Windows are trademarks of Microsoft Corporation in the United States, other countries,
-
 1
1 -
 2
2 -
 3
3 -
 4
4 -
 5
5 -
 6
6 -
 7
7 -
8
-
9
-
10
-
11
-
12
-
13
-
14
-
15
-
16
-
17
-
18
-
19
-
20
-
21
-
22
-
23
-
24
-
25
-
26
-
27
-
28
-
29
-
30
-
31
-
32
-
33
-
34
-
35
-
36
-
37
-
38
-
39
-
40
-
41
-
42
-
43
-
44
-
45
-
46
-
47
-
48
-
49
-
50
-
51
-
52
-
53
-
54
-
55
-
56
-
57
-
58
-
59
-
60
-
61
-
62
-
63
-
64
-
65
-
66
 |
 |
IdeaPad S100
Hardware
Maintenance
Manual