Lenovo PC 300PL Installing Options in your PC300PL - 6592 - Page 65
Installing a Drive in Bay 1, 2, 3, or 4
 |
View all Lenovo PC 300PL manuals
Add to My Manuals
Save this manual to your list of manuals |
Page 65 highlights
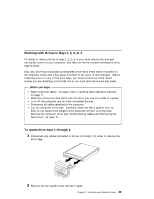
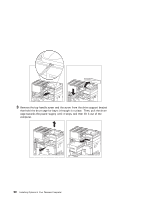
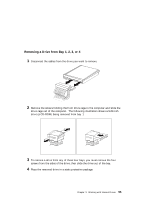
Installing a Drive in Bay 1, 2, 3, or 4 Before you begin Read "Working with Drives in Bays 1, 2, 3, or 4" on page 49. Read the documentation that comes with the drive. 1 Remove the metal shield that covers the bay you want to use. a. With the front of the drive cage facing you, remove the metal shield that covers the bay you want to use. b. You will need to pull out the tabs on the sides of the metal shield until it flexes enough for you to lift off one side, then the other. Note: If you remove a drive which has removable media from a bay and you do not intend to install a new drive immediately, replace the bay panel and the metal shield. 2 Touch the static-protective package containing the new drive to any unpainted metal surface and then remove the drive from it. Chapter 5. Working with Internal Drives 51
-
 1
1 -
2
-
3
-
4
-
5
-
6
-
7
-
8
-
9
-
10
-
11
-
12
-
13
-
14
-
15
-
16
-
17
-
18
-
19
-
20
-
21
-
22
-
23
-
24
-
25
-
26
-
27
-
28
-
29
-
30
-
31
-
32
-
33
-
34
-
35
-
36
-
37
-
38
-
39
-
40
-
41
-
42
-
43
-
44
-
45
-
46
-
47
-
48
-
49
-
50
-
51
-
52
-
53
-
54
-
55
-
56
-
57
-
58
-
59
-
 60
60 -
 61
61 -
 62
62 -
 63
63 -
 64
64 -
 65
65 -
 66
66 -
 67
67 -
 68
68 -
 69
69 -
 70
70 -
71
-
72
-
73
-
74
-
75
-
76
-
77
-
78
-
79
-
80
-
81
-
82
-
83
-
84
-
85
-
86
-
87
-
88
-
89
-
90
-
91
-
92
-
93
-
94
-
95
-
96
-
97
-
98
-
99
-
100
 |
 |
