Lenovo PC 300PL Installing Options in your PC300PL - 6592 - Page 72
Connect the cables to the drive.
 |
View all Lenovo PC 300PL manuals
Add to My Manuals
Save this manual to your list of manuals |
Page 72 highlights
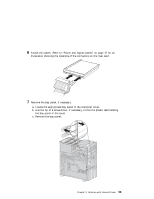
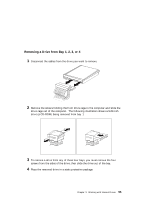
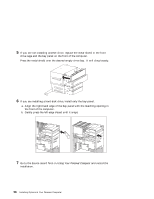
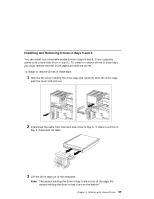
4 If you are removing a drive, remove the screws holding the drive in the cage and slide the drive out of the cage. (To remove the screws from bay 6, turn over the drive cage.) If you are installing a drive, slide the drive into the bay and secure it with the screws. 5 Reinstall the rear drive cage and secure it with the screw you removed in step 1. 6 Connect the cables to the drive. 7 Go to the device-record form in Using Your Personal Computer, and write the adapter name next to the slot into which you installed it. 58 Installing Options in Your Personal Computer
-
 1
1 -
2
-
3
-
4
-
5
-
6
-
7
-
8
-
9
-
10
-
11
-
12
-
13
-
14
-
15
-
16
-
17
-
18
-
19
-
20
-
21
-
22
-
23
-
24
-
25
-
26
-
27
-
28
-
29
-
30
-
31
-
32
-
33
-
34
-
35
-
36
-
37
-
38
-
39
-
40
-
41
-
42
-
43
-
44
-
45
-
46
-
47
-
48
-
49
-
50
-
51
-
52
-
53
-
54
-
55
-
56
-
57
-
58
-
59
-
60
-
61
-
62
-
63
-
64
-
65
-
66
-
 67
67 -
 68
68 -
 69
69 -
 70
70 -
 71
71 -
 72
72 -
 73
73 -
 74
74 -
 75
75 -
 76
76 -
 77
77 -
78
-
79
-
80
-
81
-
82
-
83
-
84
-
85
-
86
-
87
-
88
-
89
-
90
-
91
-
92
-
93
-
94
-
95
-
96
-
97
-
98
-
99
-
100
 |
 |

4
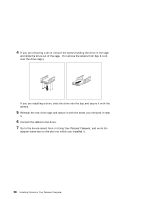
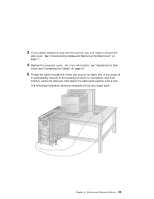
If you are removing a drive, remove the screws holding the drive in the cage
and slide the drive out of the cage.
(To remove the screws from bay 6, turn
over the drive cage.)
If you are installing a drive, slide the drive into the bay and secure it with the
screws.
5
Reinstall the rear drive cage and secure it with the screw you removed in step
1.
6
Connect the cables to the drive.
7
Go to the device-record form in
Using Your Personal Computer
, and write the
adapter name next to the slot into which you installed it.
58
Installing Options in Your Personal Computer