Lenovo ThinkCentre E51 (English, French, German, Italian, Dutch) Multilingual - Page 51
Doctor, Diagnostics, Running, Rescue, Recovery, workspace, Creating, diskette, Quick, Hardware, Create
 |
View all Lenovo ThinkCentre E51 manuals
Add to My Manuals
Save this manual to your list of manuals |
Page 51 highlights
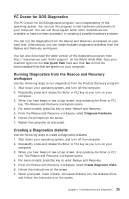
PC Doctor for DOS Diagnostics The PC Doctor for DOS Diagnostics program runs independently of the operating system. You can use this program to test hardware components of your computer. You can use this program when other methods are not available or have not been successful in isolating a possible hardware problem. You can run the diagnostics from the Rescue and Recovery workspace on your hard disk. Alternatively, you can create bootable diagnostics diskettes from the Rescue and Recovery workspace. You can also download the latest version of the diagnostics program from http://www.lenovo.com/think/support/ on the World Wide Web. Type your machine type into the Use Quick Path field and click Go to find the downloadable files that are specific to your computer. Running Diagnostics from the Rescue and Recovery workspace Use the following steps to run diagnostics from the Product Recovery program: 1. Shut down your operating system, and turn off the computer. 2. Repeatedly press and release the Enter or F11 key as you turn on your computer. 3. When you hear beeps or see a logo screen, stop pressing the Enter or F11 key. The Rescue and Recovery workspace opens. 4. For some models, press Esc key to enter Rescue and Recovery. 5. From the Rescue and Recovery workspace, select Diagnose Hardware. 6. Follow the prompts on the screen. 7. Restart the computer as instructed. Creating a Diagnostics diskette Use the following steps to create a diagnostics diskette: 1. Shut down your operating system, and turn off the computer. 2. Repeatedly press and release the Enter or F11 key as you turn on your computer. 3. When you hear beeps or see a logo screen, stop pressing the Enter or F11 key. The Rescue and Recovery workspace opens. 4. For some models, press Esc key to enter Rescue and Recovery. 5. From the Rescue and Recovery workspace, select Create diagnostic disks. 6. Follow the instructions on the screen. 7. When prompted, insert a blank, formatted diskette into the diskette drive, and follow the instructions on the screen. Chapter 5. Troubleshooting and diagnostics 25
-
 1
1 -
2
-
3
-
4
-
5
-
6
-
7
-
8
-
9
-
10
-
11
-
12
-
13
-
14
-
15
-
16
-
17
-
18
-
19
-
20
-
21
-
22
-
23
-
24
-
25
-
26
-
27
-
28
-
29
-
30
-
31
-
32
-
33
-
34
-
35
-
36
-
37
-
38
-
39
-
40
-
41
-
42
-
43
-
44
-
45
-
 46
46 -
 47
47 -
 48
48 -
 49
49 -
 50
50 -
 51
51 -
 52
52 -
 53
53 -
 54
54 -
 55
55 -
 56
56 -
57
-
58
-
59
-
60
-
61
-
62
-
63
-
64
-
65
-
66
-
67
-
68
-
69
-
70
-
71
-
72
-
73
-
74
-
75
-
76
-
77
-
78
-
79
-
80
-
81
-
82
-
83
-
84
-
85
-
86
-
87
-
88
-
89
-
90
-
91
-
92
-
93
-
94
-
95
-
96
-
97
-
98
-
99
-
100
-
101
-
102
-
103
-
104
-
105
-
106
-
107
-
108
-
109
-
110
-
111
-
112
-
113
-
114
-
115
-
116
-
117
-
118
-
119
-
120
-
121
-
122
-
123
-
124
-
125
-
126
-
127
-
128
-
129
-
130
-
131
-
132
-
133
-
134
-
135
-
136
-
137
-
138
-
139
-
140
-
141
-
142
-
143
-
144
-
145
-
146
-
147
-
148
-
149
-
150
-
151
-
152
-
153
-
154
-
155
-
156
-
157
-
158
-
159
-
160
-
161
-
162
-
163
-
164
-
165
-
166
-
167
-
168
-
169
-
170
-
171
-
172
-
173
-
174
-
175
-
176
-
177
-
178
-
179
-
180
-
181
-
182
-
183
-
184
-
185
-
186
-
187
-
188
-
189
-
190
-
191
-
192
-
193
-
194
-
195
-
196
-
197
-
198
-
199
-
200
-
201
-
202
-
203
-
204
-
205
-
206
-
207
-
208
-
209
-
210
-
211
-
212
-
213
-
214
-
215
-
216
-
217
-
218
-
219
-
220
-
221
-
222
-
223
-
224
-
225
-
226
-
227
-
228
-
229
-
230
-
231
-
232
-
233
-
234
-
235
-
236
-
237
-
238
-
239
-
240
-
241
-
242
-
243
-
244
-
245
-
246
-
247
-
248
-
249
-
250
-
251
-
252
-
253
-
254
-
255
-
256
-
257
-
258
-
259
-
260
-
261
-
262
-
263
-
264
-
265
-
266
-
267
-
268
-
269
-
270
-
271
-
272
-
273
-
274
-
275
-
276
-
277
-
278
-
279
-
280
-
281
-
282
-
283
-
284
-
285
-
286
-
287
-
288
-
289
-
290
-
291
-
292
-
293
-
294
-
295
-
296
-
297
-
298
-
299
-
300
-
301
-
302
-
303
-
304
-
305
-
306
-
307
-
308
-
309
-
310
-
311
-
312
-
313
-
314
-
315
-
316
-
317
-
318
-
319
-
320
-
321
-
322
-
323
-
324
-
325
-
326
-
327
-
328
-
329
-
330
-
331
-
332
-
333
-
334
-
335
-
336
-
337
-
338
-
339
-
340
-
341
-
342
-
343
-
344
-
345
-
346
-
347
-
348
-
349
-
350
-
351
-
352
-
353
-
354
-
355
-
356
-
357
-
358
-
359
-
360
-
361
-
362
-
363
-
364
-
365
-
366
-
367
-
368
-
369
-
370
-
371
-
372
-
373
-
374
-
375
-
376
-
377
-
378
-
379
-
380
-
381
-
382
-
383
-
384
-
385
-
386
-
387
-
388
-
389
-
390
-
391
-
392
-
393
-
394
-
395
-
396
-
397
-
398
-
399
-
400
-
401
-
402
-
403
-
404
-
405
-
406
-
407
-
408
-
409
-
410
-
411
-
412
-
413
-
414
-
415
-
416
-
417
-
418
-
419
-
420
-
421
-
422
-
423
-
424
-
425
-
426
-
427
-
428
-
429
-
430
-
431
-
432
-
433
-
434
-
435
-
436
-
437
-
438
-
439
-
440
-
441
-
442
-
443
-
444
-
445
-
446
-
447
-
448
-
449
 |
 |