Lenovo ThinkCentre Tiny-in-One 23 User Guide (English) - Page 20
Adjusting your monitor image
 |
View all Lenovo ThinkCentre Tiny-in-One 23 manuals
Add to My Manuals
Save this manual to your list of manuals |
Page 20 highlights
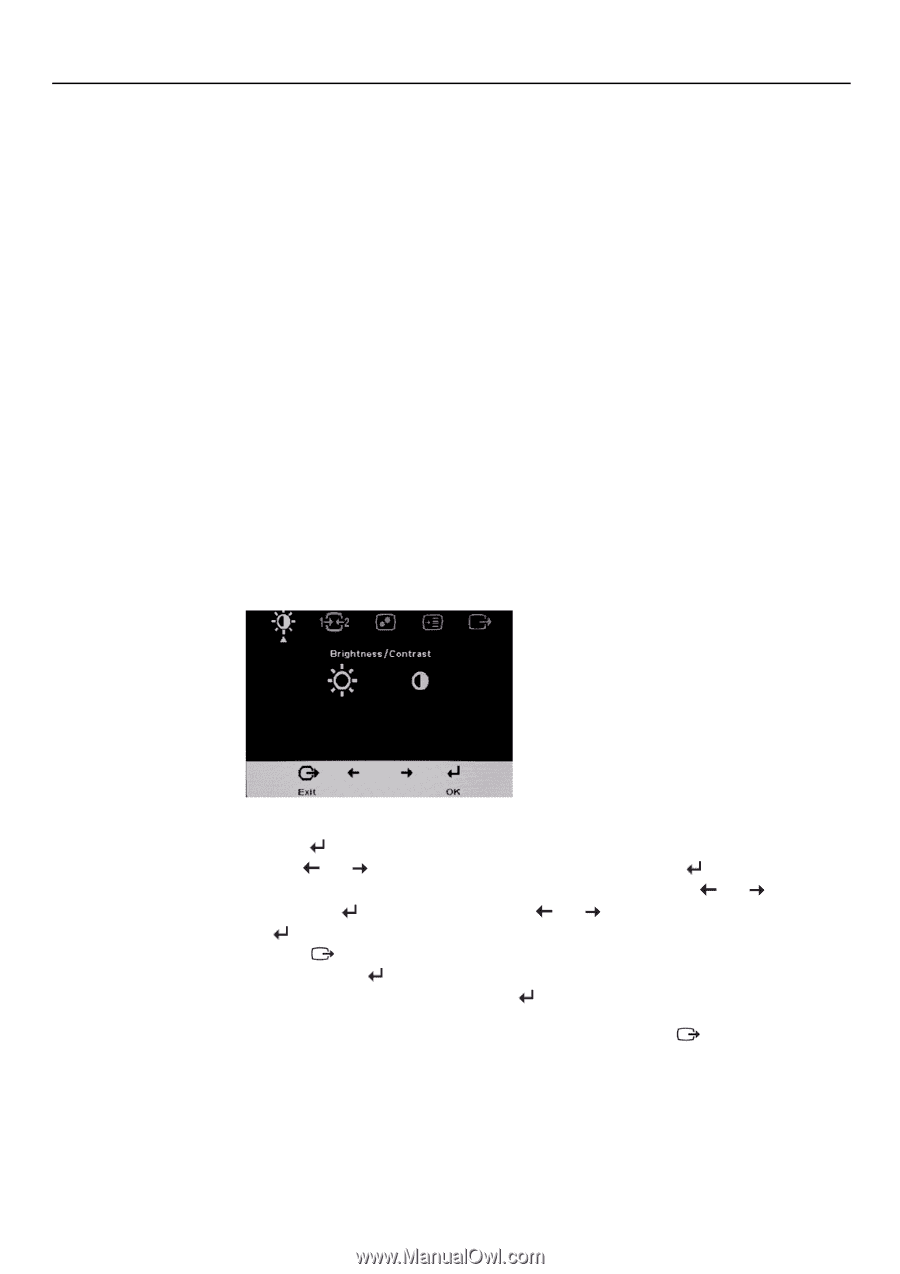
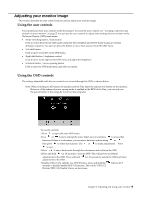
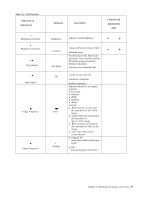
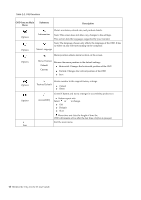
Adjusting your monitor image This section describes the user control features used to adjust your monitor image. Using the user controls Your monitor has four user controls on the front panel. To locate the user controls, see "Locating connectors and controls on your monitor" on page 2. You can use the user controls to adjust some settings of your monitor on the On Screen Display (OSD) main menu. Mode-switching button / back button Used to switch between the AIO mode (using the Tiny installed) and the DP mode (using an external desktop computer). You also can press the button to move back and exit from the OSD menu. Left shift button Used to move to the left on the OSD menu. Right shift button / brightness control Used to move to the right on the OSD menu and adjust the brightness. Selection button / menu-opening button Used to open the OSD main menu and select an option. Using the OSD controls The settings adjustable with the user controls are viewed through the OSD, as shown below. Note: When switching to AIO mode, the monitor and the Tiny share the same power button on the monitor, However, if the enhanced power saving mode is enabled in the BIOS of the Tiny, you can only use the power button of the computer to turn on the computer. To use the controls: 1.Press to open the main OSD menu. 2.Use or to move among the icons. Select an icon and press to access that function. If there is a sub-menu, you can move between options using or , then press to select that function. Use or to make adjustments. Press to save. 3.Press to move backwards through the sub-menus and exit from the OSD. 4.Press and hold for 10 seconds to lock the OSD. This will prevent accidental adjustments to the OSD. Press and hold adjustments to the OSD. for 10 seconds to unlock the OSD and allow 5.Enables DDC/CI by default. Use OSD Exit Key, press and hold the seconds to disable/enable DDC/CI function. The words " DDC/CI Disable/DDC/CI/Enable" shows on the screen. buttons for 5 Chapter 2 Adjusting and using your monitor 15
-
 1
1 -
2
-
3
-
4
-
5
-
6
-
7
-
8
-
9
-
10
-
11
-
12
-
13
-
14
-
 15
15 -
 16
16 -
 17
17 -
 18
18 -
 19
19 -
 20
20 -
 21
21 -
 22
22 -
 23
23 -
 24
24 -
 25
25 -
26
-
27
-
28
-
29
-
30
-
31
-
32
-
33
-
34
-
35
-
36
-
37
-
38
-
39
-
40
-
41
-
42
-
43
-
44
-
45
 |
 |