Lexmark Optra C710 Setup Guide - Page 67
Angle the print cartridge and place it on the carou
 |
View all Lexmark Optra C710 manuals
Add to My Manuals
Save this manual to your list of manuals |
Page 67 highlights
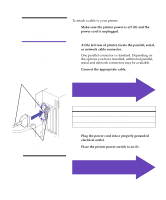
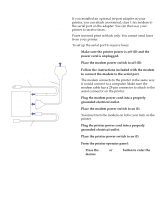
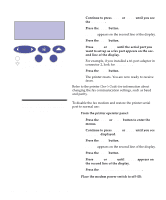
Note: Each cartridge is keyed and color coded to fit a specific location on the carousel. If the cartridge does not fit, ensure the cartridge is being placed in the correct location. Photoconductor shutter Print cartridge handle 10 Angle the print cartridge and place it on the carou- sel. The cartridge is installed with the photoconductor shutter towards the front of the printer. To align and insert the cartridge, the edge of the cartridge toward the rear of the printer must be angled downward. 11 Make sure the cartridge is lying flush on the car- ousel. 12 Press the print cartridge handle to flatten the han- dle against the print cartridge. Install the print cartridges 63
-
 1
1 -
2
-
3
-
4
-
5
-
6
-
7
-
8
-
9
-
10
-
11
-
12
-
13
-
14
-
15
-
16
-
17
-
18
-
19
-
20
-
21
-
22
-
23
-
24
-
25
-
26
-
27
-
28
-
29
-
30
-
31
-
32
-
33
-
34
-
35
-
36
-
37
-
38
-
39
-
40
-
41
-
42
-
43
-
44
-
45
-
46
-
47
-
48
-
49
-
50
-
51
-
52
-
53
-
54
-
55
-
56
-
57
-
58
-
59
-
60
-
61
-
 62
62 -
 63
63 -
 64
64 -
 65
65 -
 66
66 -
 67
67 -
 68
68 -
 69
69 -
 70
70 -
 71
71 -
 72
72 -
73
-
74
-
75
-
76
-
77
-
78
-
79
-
80
-
81
-
82
-
83
-
84
-
85
-
86
-
87
-
88
-
89
-
90
-
91
-
92
-
93
-
94
-
95
-
96
-
97
-
98
-
99
-
100
-
101
-
102
-
103
-
104
-
105
-
106
-
107
-
108
-
109
-
110
-
111
 |
 |

63
Install the print cartridges
Note:
Each cartridge is keyed
and color coded to fit a specific
location on the carousel. If the
cartridge does not fit, ensure
the cartridge is being placed in
the correct location.
10
Angle the print cartridge and place it on the carou-
sel.
The cartridge is installed with the photoconductor
shutter towards the front of the printer. To align and
insert the cartridge, the edge of the cartridge toward
the rear of the printer must be angled downward.
11
Make sure the cartridge is lying flush on the car-
ousel.
12
Press the print cartridge handle to flatten the han-
dle against the print cartridge.
Photoconductor shutter
Print cartridge handle