Lexmark Optra E plus User's Guide - Page 22
default name., Click the new desktop printer icon.
 |
View all Lexmark Optra E plus manuals
Add to My Manuals
Save this manual to your list of manuals |
Page 22 highlights
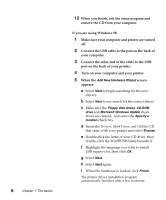
Note: Both areas of the printer dialog box show the Optra E312 printer icon. 15 In the PostScript Printer Description (PPD) File box, click Auto Setup. Wait for the information to process. The previous screen displays. Notice the new printer icon. 16 Click Create. A window appears for you to name the printer. 17 Type in the name of the printer or accept the default name. 18 Click Save. 19 Quit the Desktop Printer Utility application. The printer icon displays on your Desktop. 20 Click the new desktop printer icon. The Printing menu appears on the menu bar. 21 Scroll down in the Printing menu and select Set Default Printer. A dark line appears around the printer in the printer icon to indicate it is selected as the default printer. Troubleshooting Tips Problem: Auto Setup fails in the PostScript Printer Description (PPD) File box What to do: • Re-install the printer PPD from the CD. Connecting the printer to your computer 9
-
 1
1 -
2
-
3
-
4
-
5
-
6
-
7
-
8
-
9
-
10
-
11
-
12
-
13
-
14
-
15
-
16
-
 17
17 -
 18
18 -
 19
19 -
 20
20 -
 21
21 -
 22
22 -
 23
23 -
 24
24 -
 25
25 -
 26
26 -
 27
27 -
28
-
29
-
30
-
31
-
32
-
33
-
34
-
35
-
36
-
37
-
38
-
39
-
40
-
41
-
42
-
43
-
44
-
45
-
46
-
47
-
48
-
49
-
50
-
51
-
52
-
53
-
54
-
55
-
56
-
57
-
58
-
59
-
60
-
61
-
62
-
63
-
64
-
65
-
66
-
67
-
68
-
69
-
70
-
71
-
72
-
73
-
74
-
75
-
76
-
77
-
78
-
79
-
80
-
81
-
82
-
83
-
84
-
85
-
86
-
87
-
88
-
89
-
90
-
91
-
92
-
93
-
94
-
95
-
96
-
97
-
98
-
99
-
100
-
101
-
102
-
103
-
104
-
105
-
106
-
107
-
108
-
109
-
110
-
111
-
112
-
113
-
114
-
115
-
116
 |
 |
