Lexmark T620 Setup Guide - Page 19
Step 2: Install memory and option cards, Accessing the printer system board - firmware
 |
View all Lexmark T620 manuals
Add to My Manuals
Save this manual to your list of manuals |
Page 19 highlights
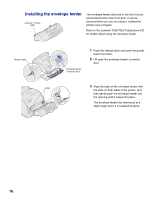
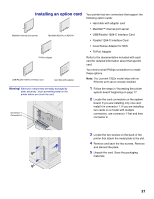
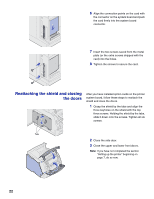
Step 2: Install memory and option cards You can customize your printer memory capacity and connectivity by adding optional cards. The instructions in this section help you install any of the following options: • Printer memory • Flash memory • Tri-Port Adapter • USB/Parallel 1284-C Interface Card • Parallel 1284-C Interface Card • MarkNet internal print servers (also called internal network adapters or INAs) • Hard disk • Optional firmware card Accessing the printer system board You must access the printer system board to install printer memory, flash memory, or an option card. 1 Make sure the printer power is off, the printer power cord is unplugged, and all cables are disconnected from the back of the printer. 2 Press the release latches to open the upper and lower front doors. 17
-
 1
1 -
2
-
3
-
4
-
5
-
6
-
7
-
8
-
9
-
10
-
11
-
12
-
13
-
 14
14 -
 15
15 -
 16
16 -
 17
17 -
 18
18 -
 19
19 -
 20
20 -
 21
21 -
 22
22 -
 23
23 -
 24
24 -
25
-
26
-
27
-
28
-
29
-
30
-
31
-
32
-
33
-
34
-
35
-
36
-
37
-
38
 |
 |
