Lexmark T620 Setup Guide - Page 30
Printing a menu settings Printing Menus - network card
 |
View all Lexmark T620 manuals
Add to My Manuals
Save this manual to your list of manuals |
Page 30 highlights
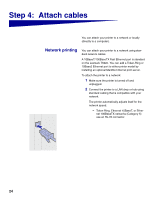
1 Press Menu until you see Utilities Menu, and then press Select. 2 Press Menu until you see Print Net Setup, and then press Select to print the page. The network setup page prints and the printer returns to Ready status. 3 Check the first section on the network setup page and confirm that Status is "Connected." Note: If an optional MarkNet card is installed in slot 1, you see Print Net1 Setup. If the card is installed in slot 2, you see Print Net2 Setup. If Status is "Not Connected," your LAN drop may not be active or your network cable may be malfunctioning. Consult your network support person, and then print another network setup page to verify that you are connected to your network. Save the network setup page for use with later instructions. 4 See "Printing a menu settings page". Printing a menu settings page Print the menu settings page to review the default printer settings and to verify that printer options are installed correctly. For more information about using the printer operator panel and changing menu settings, refer to the Lexmark T620/T622 Publications CD. 1 Press Menu until you see Utilities Menu, and then press Select. 2 Press Menu until you see Print Menus, and then press Select to print the page. The message Printing Menus is displayed. 3 Verify that the options you installed are listed under "Installed Features." If an option you installed is not listed, turn the printer off, unplug the power cord, and reinstall the option. 4 Verify the amount of memory installed is correctly listed under "Printer Information." 5 Verify that the paper trays are configured for the sizes and types of paper you loaded in the printer. 28
-
 1
1 -
2
-
3
-
4
-
5
-
6
-
7
-
8
-
9
-
10
-
11
-
12
-
13
-
14
-
15
-
16
-
17
-
18
-
19
-
20
-
21
-
22
-
23
-
24
-
 25
25 -
 26
26 -
 27
27 -
 28
28 -
 29
29 -
 30
30 -
 31
31 -
 32
32 -
 33
33 -
 34
34 -
 35
35 -
36
-
37
-
38
 |
 |