Linksys BEFSR41 User Guide - Page 13
The Router's hardware installation is now complete - reset to factory
 |
UPC - 745883549344
View all Linksys BEFSR41 manuals
Add to My Manuals
Save this manual to your list of manuals |
Page 13 highlights
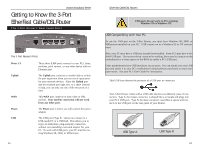
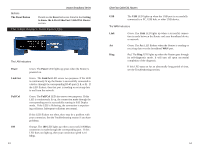
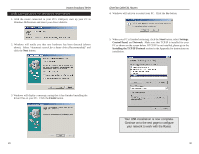
Instant Broadband Series 3. Connect the network cable from your cable or DSL modem to the WAN port on your Router's rear panel. This is the only port that will work for your modem connection. 4. Connect the power adapter to the Power port on the rear panel of the Router, then plug the power adapter into a power outlet. Note: It is highly recommended that you plug your Router into a power strip with surge protection. • The Power LED on the front panel will light up green as soon as the power adapter is connected properly. • The Diag LED will light up red for a few seconds when the Router goes through its self-diagnostic test. This LED will turn off when the self-test is complete. 5. Power on the cable or DSL modem. 6. Press the Reset button on the Router's front panel with a paper clip or a pencil. Hold the button in until the Diag LED lights up and then turns off. This will restore the Router's factory default settings. Technical Checkpoint: Did you remember to check for Link LEDs for all your connections? If all of your Link LEDs are not lighting up, make sure that all your cables are securely plugged in, and that all of your hardware is powered on properly. The Router's hardware installation is now complete! Continue with the next section to configure the Router with your PCs. EtherFast Cable/DSL Routers Uplinking: Connecting More Devices to Your Router If your Router's LAN ports are all full and you still have PCs and/or devices to connect, connect a hub or a switch to your Router. To do so, use the Router's Uplink port to connect to a standard port on a hub or switch. If you have a PC/device connected to the port right next to the Uplink port (on the 3- and 4-Port Routers), disconnect that PC/device and plug it into an open port on the new hub or switch. Since the Uplink port shares internal wiring with the port right next to it, you can only use only one of these two ports at a time: these ports are called shared ports. If your new hub or switch also has an Uplink port, it too can be uplinked when you next run out of ports, and so on. Use the Router's Uplink port to connect to a standard port on a hub or switch. This leaves you with new, open ports on the hub or switch, to which you can add more PCs and/or network devices. See your nearest Linksys retailer or visit www.linksys.com for complete product lines of 10/100 Mbps hubs and switches. 19 20
-
 1
1 -
2
-
3
-
4
-
5
-
6
-
7
-
 8
8 -
 9
9 -
 10
10 -
 11
11 -
 12
12 -
 13
13 -
 14
14 -
 15
15 -
 16
16 -
 17
17 -
 18
18 -
19
-
20
-
21
-
22
-
23
-
24
-
25
-
26
-
27
-
28
-
29
-
30
-
31
-
32
-
33
-
34
-
35
-
36
-
37
-
38
-
39
-
40
-
41
-
42
-
43
-
44
-
45
 |
 |