Linksys BEFSR41 User Guide - Page 21
The Cable/DSL Router's Web-based, Utility - default ip
 |
UPC - 745883549344
View all Linksys BEFSR41 manuals
Add to My Manuals
Save this manual to your list of manuals |
Page 21 highlights
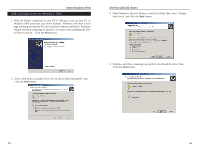
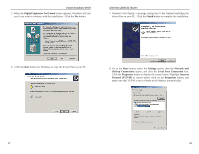
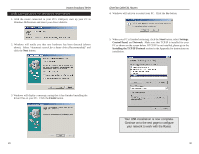
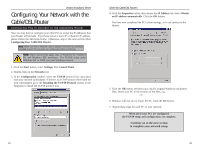
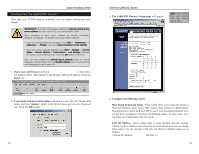
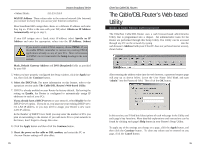
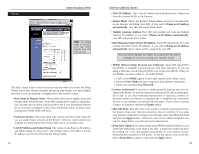
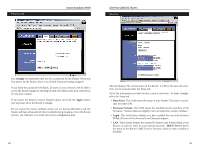
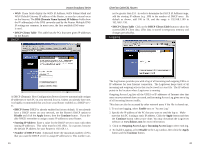
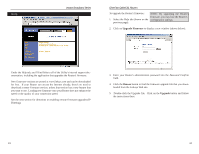
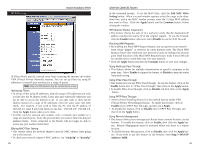
Instant Broadband Series • Subnet Mask: 255.255.255.0 WAN IP Address These values refer to the external network (the Internet) you connect to every time you access your Internet connection. Most broadband ISPs assign their clients to a different IP address each time they log on. If this is the case with your ISP, select Obtain an IP Address Automatically and go to step 5. If your ISP assigns you a fixed, static IP address, select Specify an IP Address and enter the appropriate values into the IP Address, Subnet If you need to enable PPPoE support, choose PPPoE. If you do enable PPPoE, remember to remove any existing PPPoE applications already on any of your PCs. More information on PPPoE can be found under the Setup heading in the next section. Mask, Default Gateway Address and DNS (Required) fields as provided by your ISP. 5. When you have properly configured the Setup window, click the Apply button, then click the Continue button. 6. Select the DHCP tab. For more information on this feature, refer to the apropriate section under The Cable/DSL Router's Web-based Utility. 7. DHCP is already enabled on your Router by factory default. By leaving the setting on Enable, the Router is configured to automatically assign IP addresses to each of your PCs. If you already have a DHCP server on your network, select Disable for the DHCP Server option. If you do so, you must use your existing DHCP server's LAN IP address, or you may need to assign your Router a new static LAN IP address. In the Number of DHCP Users field, you may enter the number of PCs you plan on networking to the Router. If you add more PCs to your network in the future, don't forget to change this value. 8. Click the Apply button and then click the Continue button. 9. Reset the power on the cable or DSL modem, and restart the PC so the new Router settings will take effect. 35 EtherFast Cable/DSL Routers The Cable/DSL Router's Web-based Utility Quick & Easy Router Administration The EtherFast Cable/DSL Router uses a web browser-based administrative Utility that is programmed into a chipset. All administrative tasks for the Router are performed through this Setup Utility. The Utility can be accessed through any PC on the network by typing http://192.168.1.1 into the web browser's Address field (even if that PC does not yet have Internet access), shown below. After entering the address value into the web browser, a password request page will pop up as shown below. Leave the User Name field blank and type "admin" into the Password field. Then click the OK button. In this section, you'll find brief descriptions of each web page in the Utility and each page's key functions. More detailed explanations and instructions can be found by clicking each page's Help button in your Router's Setup Utility. To apply any of the settings you change on a page, click the Apply button, and then click the Continue button. To clear any values you've entered on any page, click the Cancel button. 36
-
 1
1 -
2
-
3
-
4
-
5
-
6
-
7
-
8
-
9
-
10
-
11
-
12
-
13
-
14
-
15
-
 16
16 -
 17
17 -
 18
18 -
 19
19 -
 20
20 -
 21
21 -
 22
22 -
 23
23 -
 24
24 -
 25
25 -
 26
26 -
27
-
28
-
29
-
30
-
31
-
32
-
33
-
34
-
35
-
36
-
37
-
38
-
39
-
40
-
41
-
42
-
43
-
44
-
45
 |
 |