Linksys FESWSK5 User Guide - Page 10
Search for the best driver for your device Recommended
 |
UPC - 745883549054
View all Linksys FESWSK5 manuals
Add to My Manuals
Save this manual to your list of manuals |
Page 10 highlights
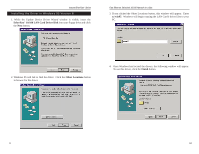
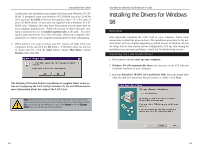
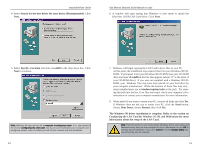
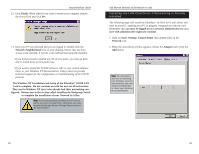
Instant EtherFast® Series 4. Select Search for the best driver for your device (Recommended). Click Next. Fast Ethernet Switched 10/100 Network In a Box 6. A window will open saying that Windows is now ready to install the EtherFast 10/100 LAN Card driver. Click Next. 5. Select Specify a location and enter a:\win98 in the drop down box. Click Next to continue. Note: Windows 98 may ask you for a computer or workgroup name. If so, skip ahead to the section Configuring the LAN Card. Once you have established your computer and workgroup names, return to where you left off and continue with the installation. 13 7. Windows will begin copying the LAN Card's driver files to your PC. At this point, the installation may require files from your Windows 98 CDROM. If prompted, insert your Windows 98 CD-ROM into your CD-ROM drive and enter d:\win98 in the box that appears (where "d" is the letter of your CD-ROM drive). If you were not supplied with a Windows 98 CDROM, your Windows files may have been placed on your hard drive by your computer manufacturer. While the location of these files may vary , many manufacturers use c:\windows\options\cabs as the path. Try entering this path into the box. If no files are found, check your computer's documentation or contact your computer manufacturer for more information. 8. When asked if you want to restart your PC, remove all disks and click Yes. If Windows does not ask you to restart your PC, click the Start button, choose Shut Down, choose Restart, then click Yes. The Windows 98 driver installation is complete. Refer to the section on Configuring the LAN Card for Windows 95, 98, and Millennium for more information about the setup of the LAN Card. Note: From this point on, you must provide Windows with a User name and Password every time you are prompted to do so. Remember to click OK to properly log into Windows. If you click Cancel or hit the Escape (ESC) key, you will not log into the network. 14
-
 1
1 -
2
-
3
-
4
-
 5
5 -
 6
6 -
 7
7 -
 8
8 -
 9
9 -
 10
10 -
 11
11 -
 12
12 -
 13
13 -
 14
14 -
 15
15 -
16
-
17
-
18
-
19
-
20
-
21
-
22
-
23
-
24
-
25
-
26
-
27
-
28
-
29
-
30
-
31
-
32
-
33
-
34
-
35
-
36
-
37
-
38
-
39
 |
 |
