Linksys FESWSK5 User Guide - Page 7
Installing the Drivers for Windows
 |
UPC - 745883549054
View all Linksys FESWSK5 manuals
Add to My Manuals
Save this manual to your list of manuals |
Page 7 highlights
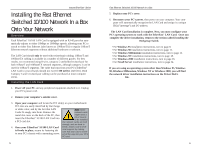
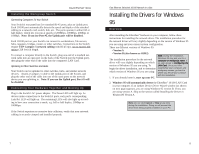
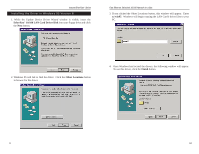
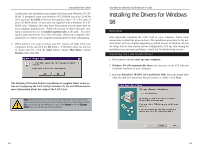
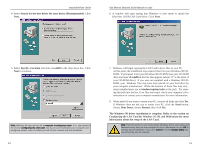
Instant EtherFast® Series Installing the Workgroup Switch Connecting Computers To Your Switch Your Switch's rear panel has five standard RJ-45 ports, plus an Uplink port. Each 10/100 port automatically detects the speed and duplex of the attached cabling to a network card, switch, hub, etc. The ports operate in either full or half duplex, which lets you run at speeds of 200Mbps, 100Mbps, 20Mbps or 10Mbps. Note: If you use Port #5, the Uplink port will be disabled. Each 10/100 port on your Switch can connect to workstations, file servers, hubs, repeaters, bridges, routers or other switches. Connections to the Switch require UTP Category 5 network cabling with RJ-45 tips, not to exceed 100 meters (328 feet) in length. To connect a computer directly to the Switch, plug one end of a standard network cable into an open port on the back of the Switch (not the Uplink port), then plug the other end of the cable into the computer's LAN Card. Uplinking to Other Switches and Hubs Your Switch can be uplinked to other switches, hubs, and similar network devices. Attach a Category 5 cable to the Uplink port of the Switch, and plug the other end of the cable into one of the open ports on the network device you are uplinking to. Note: If you use the Uplink port, Port #5 will be disabled. Connecting Your Hardware Together and Booting Up Plug in the Switch's AC power adapter. The Power LED will light up. As devices make connections to the Switch's ports, each port's corresponding Link/Act LED will light up. The remaining LEDs will also light up according to how your connection is made, e.g. full or half duplex, 10Mbps or 100Mbps. If the Switch experiences excessive data collisions, verify that your network cabling is securely crimped and installed properly. Fast Ethernet Switched 10/100 Network In a Box Installing the Drivers for Windows 95 Overview After installing the EtherFast® hardware in your computer, follow these instructions for installing the network driver. The installation procedure for the network driver will vary slightly depending on the version of Windows 95 you are using and your current system configuration. There are different versions of Windows 95: • Version A • Version B (also known as OSR2) Note: During the installation, The installation procedure for the network driver will vary slightly depending on which version of Windows 95 you are using. To begin the driver installation, and to determine which version of Windows 95 you are using: Windows 95 may ask you for a computer or workgroup name. If so, skip ahead to Configuring the LAN Card. Once you have established your computer and workgroup names, go back to where you left off and continue with the installation. 1. If you already haven't, start up your PC. 2. Windows 95 will automatically detect the EtherFast® 10/100 LAN Card in your computer. If an Update Device Driver Wizard window (as shown on next page) appears, you are using Windows 95 version B. If not, you are using version A. Skip to the section called Installing the Driver in Windows95 Version A. I Note: Do not click Cancel or Skip at any time during the installation. Doing so will prevent the driver from being properly installed on your PC. 7 8
-
 1
1 -
 2
2 -
 3
3 -
 4
4 -
 5
5 -
 6
6 -
 7
7 -
 8
8 -
 9
9 -
 10
10 -
 11
11 -
 12
12 -
13
-
14
-
15
-
16
-
17
-
18
-
19
-
20
-
21
-
22
-
23
-
24
-
25
-
26
-
27
-
28
-
29
-
30
-
31
-
32
-
33
-
34
-
35
-
36
-
37
-
38
-
39
 |
 |
