Linksys PPS1UW User Guide - Page 14
Add Cross Segment PrintServe - for window 7
 |
UPC - 745883552245
View all Linksys PPS1UW manuals
Add to My Manuals
Save this manual to your list of manuals |
Page 14 highlights
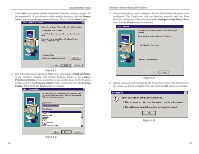
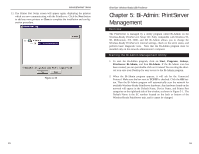
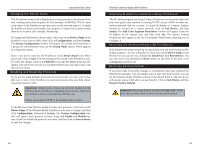
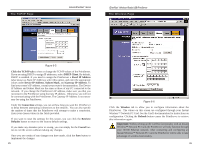
Instant EtherFast® Series Changing the Device Name The PrintServer comes with a default device name printed on the bottom of the unit, it always starts with the prefix SC (for example, SC489392). The SC name is the name of the PrintServer any time users on the network query it. To make the PrintServer more user-friendly, you can give it a unique device name to help identify its location. (for example, Marketing). To change the PrintServer's device name, click once on the Device Name of the PrintServer you want to affect, then click on Configuration, and then System. The System Configuration window will appear. To include the PrintServer in a group (for administrative use), use the Group Name option, which appears in a drop-down menu. Enter a new device name for the PrintServer in the Device Name field. When you finish, click on Save. The new setting will be stored in the PrintServer unit. To verify the change, click on the Refresh icon in the Bi-Admin menu bar. BiAdmin will search the network for available PrintServers and report back with their device names. Enabling and Disabling Protocols If you are not using multiple protocols on your network, you may want to disable one or more of the PrintServer's internal protocols; this may help reduce unwanted network traffic. Important: Always leave at least one protocol enabled on the Wireless-Ready PrintServer. Disabling all protocols could leave you without a way to communicate with the unit. Unless you require TCP/IP to be disabled, leave it alone. To disable one of the Wireless-Ready PrintServer's protocols, click once on the Device Name of the Wireless-Ready PrintServer you want to change, and then click Configuration, followed by System. The System Configuration window will appear. Each protocol is listed, along with Enable and Disable buttons. Enable or disable the protocols you want, and then click on Save to device to save the changes. EtherFast® Wireless-Ready USB PrintServer Attaching Bi-Admin to a Remote Linksys PrintServer The Bi-Admin program can locate Linksys PrintServers on networks other than your own, given your network is running TCP/IP across a WAN or other network-to-network link via a router. To attach Bi-Admin to a remote Linksys PrintServer located on a remote network, click on Init Device, and then Attach. The Add Cross Segment PrintServer window will appear. Enter the IP address of the remote unit, and then click Set. The remote Linksys PrintServer will appear in the list of available PrintServers, allowing you to configure it. Resetting the Wireless-Ready USB PrintServer If the PrintServer seems locked up for any reason, you can reset it from the BiAdmin program. To reset a PrintServer, click once on the Device Name of the PrintServer you want to reset, followed by Init Device, then Reset Device. You can also reset it by pressing the Reset button on the back of the unit, or by unplugging its power cord. Restoring Factory Default If you have made irreversible changes in configuration that have rendered the PrintServer unusable, or if you simply want to start over from scratch, you can set the Wireless-Ready PrintServer back to the default mode so that the device will operate just as it did when you purchased it. Click on Init Device, and then Restore Factory Default. Important: Restoring Factory Default will erase ALL of the work that you have done on this unit since purchasing it. 21 22
-
 1
1 -
2
-
3
-
4
-
5
-
6
-
7
-
8
-
 9
9 -
 10
10 -
 11
11 -
 12
12 -
 13
13 -
 14
14 -
 15
15 -
 16
16 -
 17
17 -
 18
18 -
 19
19 -
20
-
21
-
22
-
23
-
24
-
25
-
26
-
27
-
28
-
29
-
30
-
31
-
32
 |
 |
