Linksys PPS1UW User Guide - Page 15
Configuring the, EtherFast, Wireless-Ready USB, PrintServer Using the Web, Based Utility - software
 |
UPC - 745883552245
View all Linksys PPS1UW manuals
Add to My Manuals
Save this manual to your list of manuals |
Page 15 highlights
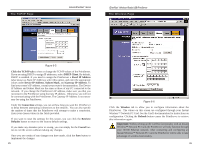
Instant EtherFast® Series Chapter 6: Configuring the EtherFast® Wireless-Ready USB PrintServer Using the Web- Based Utility Accessing the Web-Based Utility You can use the PrintServer's built-in Web-based Utility to configure the PrintServer. In order to open the Utility, follow the instructions below. Open your web brows- er and type http:// followed by the Figure 6-1 PrintServer's IP address in the browser's Address box. Use the Bi-Admin soft- ware to find the IP address. Press Enter. The Password Screen will appear next. Leave the User Name field blank. The Password field will be blank as well. If you want to password protect the PrintServer, enter a password now. If you don't want to be required to enter this password every time you log on, check the box next to Save this password in your password list. This will automatically log you in when you return to this page. (If you change your password, the automatic login will not work until you save the new password over the old one.) If you decide to enter a password, do so and click the OK button. Otherwise, just click the OK button. EtherFast® Wireless-Ready USB PrintServer The Server Page When the Configure Server screen appears, enter the PrintServer name (in Figure 6-3, the example is SCA71107). Then enter your pass- word (if you created one) into the Password field, and type it again in the Verify Password field to confirm it. Check all boxes that apply to your network next to the Enable area Figure 6-3 under Protocols. Generally, AppleTalk is only for Macintosh networks. If you are unsure, however, you may check all boxes. This option, while giving you the greatest chance of connection, increases network traffic. Once you've made all your choices, click the Save button. Then click the Reset button to apply your changes. The Printer Page Figure 6-2 23 Figure 6-4 Click the Printer tab to open the Printer Status screen. On this screen, you will be able to see the status of any printers connected to the PrintServer. You can also test the printers by clicking the Print Test Page button corresponding to the printer you want to test. 24
-
 1
1 -
2
-
3
-
4
-
5
-
6
-
7
-
8
-
9
-
 10
10 -
 11
11 -
 12
12 -
 13
13 -
 14
14 -
 15
15 -
 16
16 -
 17
17 -
 18
18 -
 19
19 -
 20
20 -
21
-
22
-
23
-
24
-
25
-
26
-
27
-
28
-
29
-
30
-
31
-
32
 |
 |
