Linksys WRE54G Cisco WAP54GP Wireless-G Exterior Access Point User Guide - Page 25
The Setup - Time Tab - problems
 |
UPC - 745883559046
View all Linksys WRE54G manuals
Add to My Manuals
Save this manual to your list of manuals |
Page 25 highlights
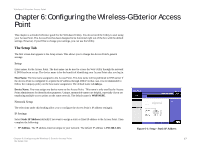
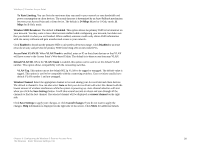
Wireless-G Exterior Access Point • Subnet Mask. The Subnet Mask must be the same as that set on the LAN that your Access Point is connected to. The default is 255.255.255.0. Select Automatic Configuration - DHCP if you have a DHCP server enabled on the LAN that can assign an IP address to the Access Point. Change these settings as described here and click Save Settings to apply your changes, or click Cancel Changes to cancel your changes. Help information is displayed on the right-hand side of the screen. The Setup - Time Tab This allows you to change the Access Point's time settings. The correct time setting can help the administrator search the system log to identify problems. Time Figure 6-2: Setup - Automatic Configuration - DHCP If the Access Point can access the Web, the time can be set automatically. You can always set the time manually. Manually. This is the default setting. If it is not already selected, click on Manually. Then use the drop down menus to select the month, day and year. Enter the hour, minute and seconds. Automatically. When you click on this option, you will need to select your correct time zone from the drop down menu. The time zone is based on GMT (Greenwich Mean Time). After you select the time zone, the Access Point will contact the web-based public time server to get the current time. Auto Daylight Saving. Enable this option if you want Daylight Saving time to be adjusted automatically according to your time zone. The default is Disabled. User Defined NTP Server. Enable this option if you have set up local NTP server. The default is Disabled. NTP Server IP. If you enabled the User Defined NTP Server, you will need to enter its IP address. Figure 6-3: Setup - Time Click Save Settings to apply your changes, or click Cancel Changes if you don't want to apply the changes. For more intomraion, click Help on the righ side of the screen. Chapter 6: Configuring the Wireless-G Exterior Access Point 18 The Setup - Time Tab
-
 1
1 -
2
-
3
-
4
-
5
-
6
-
7
-
8
-
9
-
10
-
11
-
12
-
13
-
14
-
15
-
16
-
17
-
18
-
19
-
 20
20 -
 21
21 -
 22
22 -
 23
23 -
 24
24 -
 25
25 -
 26
26 -
 27
27 -
 28
28 -
 29
29 -
 30
30 -
31
-
32
-
33
-
34
-
35
-
36
-
37
-
38
-
39
-
40
-
41
-
42
-
43
-
44
-
45
-
46
-
47
-
48
-
49
-
50
-
51
-
52
-
53
-
54
-
55
-
56
-
57
-
58
-
59
-
60
-
61
-
62
-
63
-
64
-
65
-
66
-
67
-
68
-
69
-
70
-
71
-
72
-
73
-
74
-
75
-
76
 |
 |
