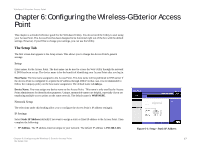
Linksys WRE54G Cisco WAP54GP Wireless-G Exterior Access Point User Guide - Page 27
Access Point VLAN ID - compatibility
 |
UPC - 745883559046
View all Linksys WRE54G manuals
Add to My Manuals
Save this manual to your list of manuals |
Page 27 highlights
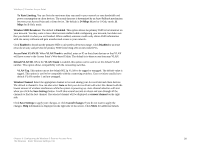
Wireless-G Exterior Access Point Tx Rate Limiting. You can limit the maximum data rate used in your network to save bandwidth and power consumption on client devices. The actual data rate is determined by an Auto-Fallback mechanism between your Access Point and a client device. The default is 54 Mbps Mixed or G-Only mode, 11 Mbps for B-Only mode. Wireless SSID Broadcast. The default is Enabled. This option allows the primary SSID to be broadcast on your network. You may want to leave this function enabled while configuring your network, but make sure that you disable it when you are finished. When enabled, someone could easily obtain SSID information with site survey software and gain unauthorized access to your network. Click Enabled to broadcast the primary SSID to all wireless devices in range. Click Disabled to increase network security and prevent the primary SSID from being seen on networked PCs. Access Point VLAN ID. When VLAN Trunk is enabled, enter an ID so that client devices on that VLAN will have access to the Access Point's Web-based Utility. The default is to deny access from any VLAN. Default VLAN ID. When the VLAN Trunk is enabled, this option can be used to set the default VLAN number. This option allows compatibility with the connecting switches. VLAN Tag. This option can set the default 802.1q VLAN to be tagged or untagged. The default value is tagged. This option is used to be compatible with the connecting switches. Cisco switches usually have default VLAN number 1 and are untagged. Wireless Channel. Select the appropriate channel to be used among your Access Point and client devices. The default is channel 6. You can also select Auto so that your Access Point will select the channel with the lowest amount of wireless interference while the system is powering up. Auto channel selection will start when you click the Save Settings button. It will take several seconds to reboot and scan through all the channels to find the best channel. The selected channel will be displayed as current channel on the right side. Click Save Settings to apply your changes, or click Cancel Changes if you do not want to apply the changes. Help information is displayed on the right side of the screen. Click More for additional details. Chapter 6: Configuring the Wireless-G Exterior Access Point 20 The Wireless - Basic Wireless Settings Tab
-
 1
1 -
2
-
3
-
4
-
5
-
6
-
7
-
8
-
9
-
10
-
11
-
12
-
13
-
14
-
15
-
16
-
17
-
18
-
19
-
20
-
21
-
 22
22 -
 23
23 -
 24
24 -
 25
25 -
 26
26 -
 27
27 -
 28
28 -
 29
29 -
 30
30 -
 31
31 -
 32
32 -
33
-
34
-
35
-
36
-
37
-
38
-
39
-
40
-
41
-
42
-
43
-
44
-
45
-
46
-
47
-
48
-
49
-
50
-
51
-
52
-
53
-
54
-
55
-
56
-
57
-
58
-
59
-
60
-
61
-
62
-
63
-
64
-
65
-
66
-
67
-
68
-
69
-
70
-
71
-
72
-
73
-
74
-
75
-
76
 |
 |
