Linksys WRT160NL User Guide - Page 40
Advanced Configuration (Advanced Users Only), Access the Web-Based Utility - default ip
 |
UPC - 745883587650
View all Linksys WRT160NL manuals
Add to My Manuals
Save this manual to your list of manuals |
Page 40 highlights
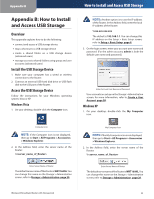
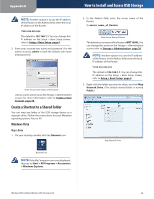
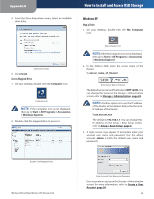
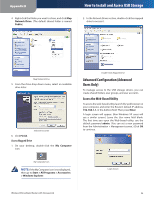
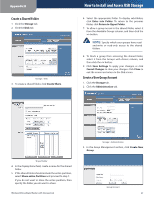
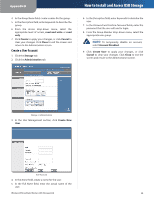
Appendix B 4. Right-click the folder you want to share, and click Map Network Drive. (The default shared folder is named Public.) How to Install and Access USB Storage 2. In the Network Drives section, double-click the mapped drive to access it. Map Network Drive 5. From the Drive drop-down menu, select an available drive letter. Select Drive Letter 6. Click Finish. Access Mapped Drive 1. On your desktop, double-click the My Computer icon. Double-Click Mapped Drive Advanced Configuration (Advanced Users Only) To manage access to the USB storage device, you can create shared folders, user groups, and user accounts. Access the Web-Based Utility To access the web-based utility, launch the web browser on your computer, and enter the Router's default IP address, 192.168.1.1, in the Address field. Then press Enter. A login screen will appear. (Non-Windows XP users will see a similar screen.) Leave the User name field blank. The first time you open the Web-based utility, use the default password admin. (You can set a new password from the Administration > Management screen.) Click OK to continue. My Computer Icon NOTE: If the My Computer icon is not displayed, then go to Start > All Programs > Accessories > Windows Explorer. Login Screen Wireless-N Broadband Router with Storage Link 36
-
 1
1 -
2
-
3
-
4
-
5
-
6
-
7
-
8
-
9
-
10
-
11
-
12
-
13
-
14
-
15
-
16
-
17
-
18
-
19
-
20
-
21
-
22
-
23
-
24
-
25
-
26
-
27
-
28
-
29
-
30
-
31
-
32
-
33
-
34
-
 35
35 -
 36
36 -
 37
37 -
 38
38 -
 39
39 -
 40
40 -
 41
41 -
 42
42 -
 43
43 -
 44
44 -
 45
45 -
46
-
47
-
48
-
49
-
50
-
51
-
52
-
53
-
54
-
55
-
56
-
57
-
58
-
59
-
60
-
61
-
62
-
63
-
64
-
65
 |
 |