Linksys WRTU54G TM User Guide - Page 14
The Front Panel, Power, Ethernet 1-4, Wireless, Phone1/Phone2, Internet, Pairing - new
 |
UPC - 745883575350
View all Linksys WRTU54G TM manuals
Add to My Manuals
Save this manual to your list of manuals |
Page 14 highlights
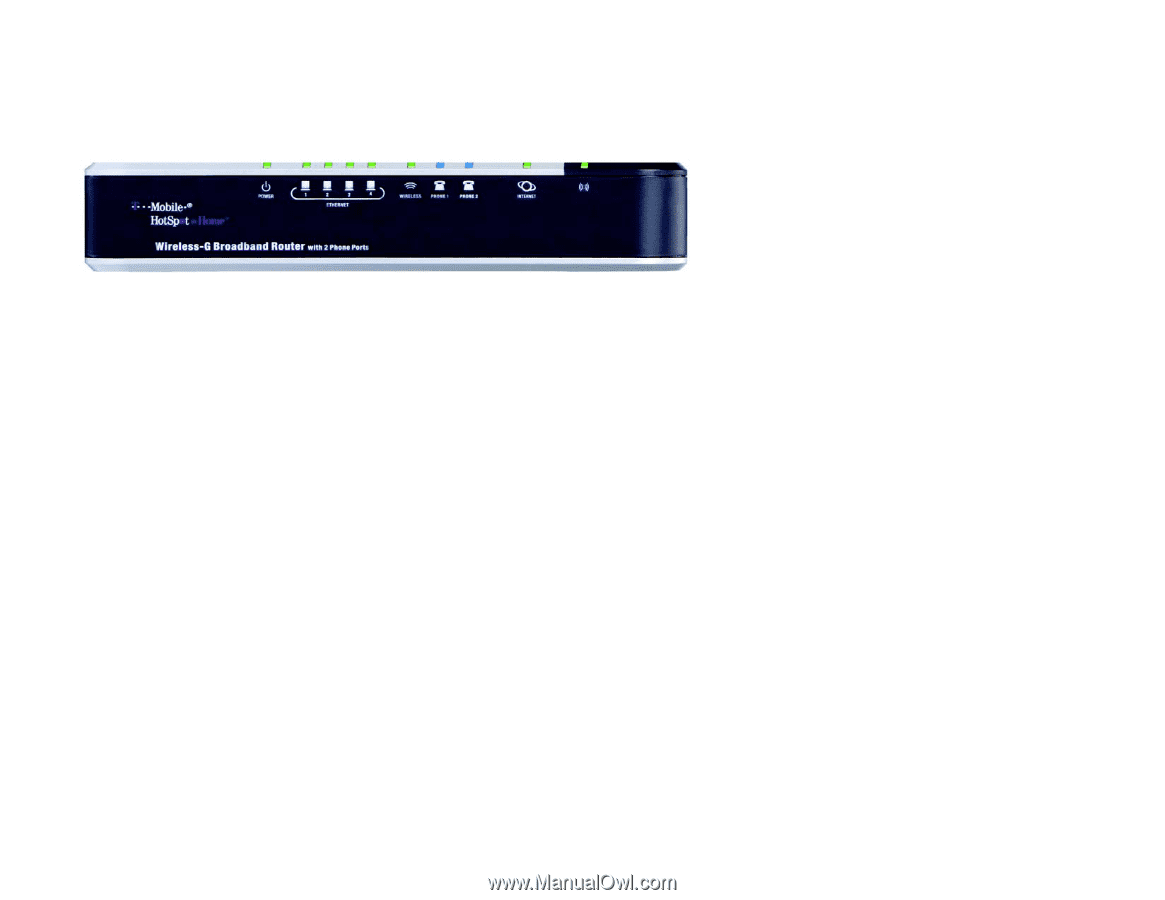
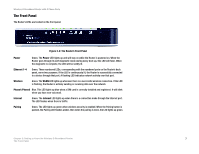
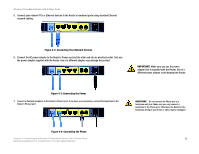
Wireless-G Broadband Router with 2 Phone Ports The Front Panel The Router's LEDs are located on the front panel. Figure 3-2: The Router's Front Panel Power Green. The Power LED lights up and will stay on while the Router is powered on. When the Router goes through its self-diagnostic mode during every boot-up, this LED will flash. When the diagnostic is complete, the LED will be solidly lit. Ethernet 1-4 Green. These numbered LEDs, corresponding with the numbered ports on the Router's back panel, serve two purposes. If the LED is continuously lit, the Router is successfully connected to a device through that port. A flashing LED indicates network activity over that port. Wireless Green. The WLAN LED lights up whenever there is a successful wireless connection. If the LED is flashing, the Router is actively sending or receiving data over the network. Phone1/Phone2 Blue. This LED lights up blue when a SIM card is correctly installed and registered. It will blink when you have new voicemail. Internet Green. The Internet LED lights up when there is a connection made through the Internet port. The LED flashes when there is traffic. Pairing Green. The LED lights up green when wireless security is enabled. When the Pairing button is pushed, the Pairing LED flashes amber, then when the pairing is done, the LED lights up green. Chapter 3: Getting to Know the Wireless-G Broadband Router 7 The Front Panel
-
 1
1 -
2
-
3
-
4
-
5
-
6
-
7
-
8
-
 9
9 -
 10
10 -
 11
11 -
 12
12 -
 13
13 -
 14
14 -
 15
15 -
 16
16 -
 17
17 -
 18
18 -
 19
19 -
20
-
21
-
22
-
23
-
24
-
25
-
26
-
27
-
28
-
29
-
30
-
31
-
32
-
33
-
34
-
35
-
36
-
37
-
38
-
39
-
40
-
41
-
42
-
43
-
44
-
45
-
46
-
47
-
48
-
49
-
50
-
51
-
52
-
53
-
54
-
55
-
56
-
57
-
58
-
59
-
60
-
61
-
62
-
63
-
64
-
65
-
66
-
67
-
68
-
69
-
70
-
71
-
72
-
73
-
74
-
75
-
76
-
77
-
78
-
79
-
80
-
81
-
82
-
83
-
84
-
85
-
86
-
87
-
88
-
89
-
90
-
91
-
92
-
93
-
94
-
95
-
96
-
97
-
98
-
99
-
100
-
101
-
102
-
103
-
104
-
105
-
106
-
107
 |
 |