Linksys WVC200 Cisco WVC200 2.4 GHz Wireless-G PTZ Internet Camera with Audio - Page 17
Placement Options, Stand Option, Wall Mount Option
 |
UPC - 745883569045
View all Linksys WVC200 manuals
Add to My Manuals
Save this manual to your list of manuals |
Page 17 highlights
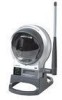
Connecting the PTZ Internet Camera Placement Options Placement Options There are two ways to place the camera. The first way is to place the camera horizontally on a surface using the included stand. The second way is to mount the camera on a wall using an optional wall mount stand. The wall mount is not supplied in the camera kit. Stand Option 1. The camera includes a camera Desktop Stand. Insert the bottom end of the camera into the Stand. 2. Place the camera, and adjust its aim accordingly. Wall Mount Option There is a standard stand (not included) that can be used to attach to the back of the camera (1/4"x20 thread) to allow the camera to be mounted on a wall or ceiling. WVC200-210 User Guide 13
-
 1
1 -
2
-
3
-
4
-
5
-
6
-
7
-
8
-
9
-
10
-
11
-
 12
12 -
 13
13 -
 14
14 -
 15
15 -
 16
16 -
 17
17 -
 18
18 -
 19
19 -
 20
20 -
 21
21 -
 22
22 -
23
-
24
-
25
-
26
-
27
-
28
-
29
-
30
-
31
-
32
-
33
-
34
-
35
-
36
-
37
-
38
-
39
-
40
-
41
-
42
-
43
-
44
-
45
-
46
-
47
-
48
-
49
-
50
-
51
-
52
-
53
-
54
-
55
-
56
-
57
-
58
-
59
-
60
-
61
-
62
-
63
-
64
-
65
-
66
-
67
-
68
-
69
-
70
-
71
-
72
-
73
-
74
-
75
-
76
-
77
-
78
-
79
-
80
 |
 |

WVC200-210 User Guide
13
Placement Options
Connecting the PTZ Internet Camera
Placement Options
There are two ways to place the camera. The first way is to place the camera horizontally on a
surface using the included stand. The second way is to mount the camera on a wall using an
optional wall mount stand. The wall mount is not supplied in the camera kit.
Stand Option
1.
The camera includes a camera Desktop Stand. Insert the bottom end of the camera into the
Stand.
2.
Place the camera, and adjust its aim accordingly.
Wall Mount Option
There is a standard stand (not included) that can be used to attach to the back of the camera
(1/4"x20 thread) to allow the camera to be mounted on a wall or ceiling.